- UID
- 5280
- 积分
- 9543
- 精华
- 贡献
-
- 威望
-
- 活跃度
-
- D豆
-
- 在线时间
- 小时
- 注册时间
- 2002-5-18
- 最后登录
- 1970-1-1
|
马上注册,结交更多好友,享用更多功能,让你轻松玩转社区。
您需要 登录 才可以下载或查看,没有账号?立即注册


×
从 .NET 开发人员的角度理解 Excel 对象模型
摘要:讨论了 Microsoft Office Excel 2003 提供的一些对象,并且说明了如何使用它们通过用于 Microsoft Office 系统的 Microsoft Visual Studio 工具来创建托管代码解决方案。重点主要是 Application、Workbook、Worksheet 和 Range 对象。Visual Basic .NET 和 Visual C# 代码示例演示了每个对象一些属性、方法和事件。
从 Microsoft 下载中心下载 ExcelObj.exe。
 本页内容简介对于打算利用用于 Microsoft Office 系统的 Microsoft Visual Studio 工具的开发人员和想要仅仅使用 COM 自动化来控制 Microsoft Office Excel 2003 应用程序的人来说,他们需要能够与 Excel 对象模型提供的对象进行交互。Excel 提供了数百个您可能想要与之交互的对象,但是您可以通过集中于这些可用的对象的一个非常小的子集来获得对象模型方面的一个良好的开端。这些对象包括:
| • | Application
| | • | Workbook
| | • | Worksheet
| | • | Range
|
尽管不可能具体地量化,但是当您使用 Excel 时,大部分的工作将以这四个类以及它们的成员为核心。在本文档中,您将学会如何利用这些类中的每一个,另外,我们还会向您介绍每个类的一些属性、方法和事件。您也将会看到一些可以尝试的示例,这些示例演示了每个对象的一些功能。
提示总的说来,使用 Microsoft Visual Basic .NET 的开发人员在使用 Microsoft Office 对象时,相比于使用 Microsoft Visual C# 的开发人员来说要轻松得多,一个重要的原因在于:Visual Basic for Applications (VBA) 方法常包含可选参数,而 Visual Basic .NET 支持可选参数。C# 开发人员将发现他们必须为每个可选方法参数提供一个值,而 Visual Basic .NET 开发人员可以简单地使用命名的参数只提供他们需要的值。另外,C# 不支持带有参数的属性(除了索引器以外),然而,许多 Excel 属性可以接受参数。您将会发现,对于 C# 开发人员来说,一些属性(例如可用于 VBA 和 Visual Basic .NET 的 Application.Range 属性)需要单独的访问器方法(get_Range 方法替换了 Range 属性)。在本文中,请注意这样的语言之间存在的差异。
在大多数情况下,您将会发现 Excel 对象模型直接模拟其用户界面。不难猜想,Application 对象提供了封装整个应用程序的包装,并且每个 Workbook 对象都包含 Worksheet 对象的一个集合。其中,表示单元格的主要的抽象是 Range 对象,这使得您能够使用单个单元格或者单元格组。
下面的每个部分都将描述一个主要的 Excel 对象,挑选对象的特定成员来进行演示。由于可供研究的对象有数百个,所以不可能在这里对所有的对象进行深入的探讨:您将会得到足够的对象模型方面的知识来开始您的工作,并且可以使用 Excel 联机帮助来获得更详细的信息。
提示 在本文中,您将看到 DirectCast 和 CType 方法的许多用途。其原因在于示例项目有自己的 OptionStrict 设置 — 这意味着 Visual Basic .NET 需要严格的类型转换。许多 Excel 方法和属性返回 Object 类型或者依赖于晚期绑定:例如,Application.ActiveSheet 属性返回 Object,而不是您猜想的 Worksheet。因此,为了尽可能地进行严格的类型转换,示例启用了 Option Strict,并且显式地处理每种类型转换。(如果不在 Visual Basic .NET 中使用 Option Strict,您编写的代码可能编译良好,但是会在运行时失败。这就是 Option Strict 意义所在 — 它大大减少了非法转换在运行时产生异常的可能性)。如果您是一名正在阅读本文档的 C# 开发人员,您可能会赞赏这种决定。
这本白皮书引用了示例项目 ExcelObjectModel.sln。这个项目包含一个 Excel 工作簿以及相关的 Visual Basic .NET 代码。并不是本文中展示的每个示例都出现在这个示例项目中,但是需要多于一行或两行代码的任何示例都放到了工作簿中,并且在项目内设置了调用代码的超级链接。
提示 在这篇篇幅有限的文章中,不可能对每个对象或成员进行注解。甚至不可能提及这些类中的一小部分。研究任何大型对象模型最好的工具是 Object Browser 窗口,其中,您可以找到每个类的列表、以及该类的成员。您将会发现,在本文档中讨论的许多类成员适用于许多其他不同的类:例如,在 Sheets 集合的上下文中讨论的 PrintOut方法同样适用于 Chart、Worksheet、Range 和其他的对象。本文档旨在让您知道什么是可用的,而剩下的东西要靠您好奇的本性来挖掘了。
 返回页首
返回页首
Application 对象Excel Application 对象代表 Excel 应用程序本身。这可能听起来是显而易见的,但是 Application 对象公开了大量关于运行时应用程序、应用到该实例的一些选项、以及在该实例内打开的当前用户对象的信息。Application 对象提供了许多成员,其中的许多成员您从来都不需要研究,但是其他的一些成员对于您的应用程序的行为是否正确至关紧要。您可以将这些成员分为以下种类:
| • | 在 Excel 中控制状态和显示的成员
| | • | 返回对象的成员
| | • | 执行操作的成员
| | • | 处理文件操作的成员
| | • | 其他成员
|
下面几部分介绍了这些组中的每一个、以及演示一些成员的代码示例。
在 Excel 中控制状态和显示的成员Application 对象提供了一个大的属性集来控制 Excel 的一般状态。表 1 列出了与状态有关的 Application 对象属性的一个子集。
表 1. 一些控制 Excel 的状态的 Application 属性
属性类型说明
Cursor XlMousePointer (xlDefault, xlIBeam, xlNorthwestArrow, xlWait)
EditDirectlyInCell 布尔值 直接就地获取或设置编辑单元格的能力。如果为 False,则您只能在公式栏中编辑单元格。
FixedDecimal 布尔值 如果为 True,则所有的数字值都使用 FixedDecimalPlaces 属性来确定小数位数;否则将忽略 FixedDecimalPlaces 属性(默认值为 False)。
FixedDecimalPlaces Long 确定用于数值数据的小数位数(如果 FixedDecimal 属性为 True)。
Interactive 布尔值 获取或设置用户通过键盘和鼠标与 Excel 交互的能力;如果将此属性设置成 False,则一定要确保在异常处理程序中将其重新设置成 True。Excel 不会自动为您重新设置它。
MoveAfterReturn 布尔值 如果为 True,则当您按下 Enter 键时,选择会移到下一个单元格;默认值为 True。
MoveAfterReturnDirection xlDirection (xlDown, xlToLeft, xlToRight, xlUp) 指示在按下 Enter 键之后移动的方向(如果 MoveAfterReturn 属性为 True)。默认值为 xlDown。
ScreenUpdating 布尔值 如果为 True,Excel 就会在每个方法调用之后更新其屏幕。为了节省时间并且使您的应用程序看起来更加专业,您可以在代码运行时关掉显示。一旦完成,就一定要再次将此属性值重新设置为 True。Excel 不会自动为您重新设置它。
SheetsInNewWorkbook Long 获取或设置 Excel 自动放置在新的工作簿中的工作表的数目。
StandardFont 字符串 获取或设置 Excel 中默认字体的名称;只有在重新启动 Excel 之后才会生效。
StandardFontSize Long 获取或设置 Excel 中默认字体的大小;只有在重新启动 Excel 之后才会生效。
StartupPath(只读) 字符串 返回包含 Excel 启动加载项的文件夹的完整路径。
TemplatesPath(只读) 字符串 返回包含模板的文件夹的完整路径;此值代表着一个 Windows 特殊文件夹。
在表 1 所列出的所有属性中,您最可能使用的一个属性是 ScreenUpdating 属性。通过利用这个属性,您不但可以使您的 Excel 应用程序看起来更加专业,还可以使它们运行得更快 — 在每次修改后更新显示会严重影响代码的运行效率,特别是在大范围中通过编程方式填写时。然而,重要的是,当您完成您的工作时始终要设置这个属性,因为 Excel 不会为您重新设置它。因此,当使用 ScreenUpdating 属性时,您将需要始终使用如下代码片段,并且利用 .NET 异常处理来确保屏幕更新恢复:
' Visual BasicTry ThisApplication.ScreenUpdating = False ' Do your work that updates the screen.Finally ThisApplication.ScreenUpdating = TrueEnd Try// C#try{ ThisApplication.ScreenUpdating = false; // Do your work that updates the screen.}finally{ ThisApplication.ScreenUpdating = true;}Application 对象还提供了一组控制 Excel 中的显示的属性。您可以修改这些属性中的任何一个来改变用户在屏幕上所看到的内容。表 2 列出了可用的显示选项的一个子集。
表 2 一些控制 Excel 的外观的 Application 属性
属性类型说明
DisplayAlerts 布尔值 如果为 True(默认值),则当运行代码时,只要有必要(例如在删除一个工作表时),Excel 就会显示警告消息。设置为 False 以忽略警告。Excel 的行为就好像您已经为每个警告选择了默认值。
DisplayFormulaBar 布尔值 如果为 True(默认值),Excel 就会显示标准公式栏以编辑单元格;设置为 False 以隐藏公式栏。
DisplayFullScreen 布尔值 如果为 True,则 Excel 以全屏模式运行(这种模式与仅仅最大化 Excel 窗口的效果不一样);其默认值为 False。
提示 与 ScreenUpdating 属性完全一样,重新设置 DisplayAlerts 属性是非常重要的。因为 Excel 不会为您重新设置此属性,并且它设置为 False,所以在您关闭工作簿之前 Excel 不会提示您保存它们;没有仔细地重新设置DisplayAlerts 属性可能会在您不小心的情况下导致您丢失数据。
返回对象的成员许多 Application 对象的属性返回其他的对象。因为 Visual Studio .NET 提供的标准 Microsoft Office 项目模板只包含 ThisApplication 和 ThisWorkbook 对象,所以您通常需要利用 Application 类的对象成员来引用 Excel 提供的其他对象。您可以使用这些成员通过诸如 ActiveWindow 的属性检索对特定子对象的引用,或者通过诸如Charts 的属性检索对一个可用的对象集的引用。表 3 列出了 Application 对象的返回对象的属性的一个子集。
表 3. Application 对象的可用的返回对象的属性的一个子集。
属性类型说明
ActiveCell 范围 返回对活动窗口(顶部的窗口)中当前活动单元格的引用。如果没有活动窗口,此属性会产生一个错误。
ActiveChart 图表 返回对当前活动的图表的引用。对于一个嵌入式图表来说,只有当此图表被选中或被激活时才可认为是活动的。
ActiveSheet 对象
ActiveWindow 窗口 返回对活动窗口(顶部的窗口)的引用;如果没有活动窗口,则不返回任何结果。
Charts 工作表 返回 Sheet 对象(Chart 和 Worksheet 对象的父对象)的集合,这些对象包含对活动工作簿中的每个图表的引用。
Selection 对象 返回应用程序中选中的对象。可能是一个 Range、一个 Worksheet 或任何其他的对象 — 同样适用于 Window 类,在这种情况下,选择通常是一个 Range 对象。如果当前没有对象被选中,则不返回任何结果。
Sheets 工作表 返回 Sheet 对象的集合,这些对象包含对活动工作簿中每个工作表的引用。
Workbooks 工作簿 返回 Workbook 对象的集合,这些对象包含对所有打开的工作簿的引用。
您将会最常与 Application 类的 Workbooks 属性交互。这个属性使得您能够循环访问打开的工作簿、打开或创建一个新的工作簿。下面的部分描述了这个属性的行为。
工作簿集合
Workbooks 集合使得有可能使用所有打开的工作簿、创建一个新的工作簿以及将数据导入一个新的工作簿。下表列出了您将发现的 Workbooks 集合的主要用途:
| • | 创建一个新的工作簿 使用如下代码(您也可以指定一个工作簿模板的名称作为 Add 方法的一个参数):
' Visual BasicDim wb As Excel.Workbook = ThisApplication.Workbooks.Add()// C#Excel.Workbook wb = ThisApplication.Workbooks.Add(Type.Missing); | | • | 关闭所有打开的工作簿。与大多数的集合不同,这个集合允许您一次性地关闭所有的成员。下面的方法调用关闭所有打开的工作簿:
' Visual BasicThisApplication.Workbooks.Close()// C#ThisApplication.Workbooks.Close(); | | • | 打开一个现有的工作簿(使用 Workbooks 集合的 Open 方法)。最简单的形式是使用 Open 方法,如下面的代码片段所示。Open 方法提供了大量的可选参数,这些参数会影响它在特定环境中的行为,但是,您通常不需要使用这些可选参数:
' Visual BasicDim wb As Excel.Workbook = _ ThisApplication.Workbooks.Open("C:/YourPath/YourWorkbook.xls")// C#Excel.Workbook wb = ThisApplication.Workbooks.Open( "C://YourPath//Yourworkbook.xls", Type.Missing, Type.Missing, Type.Missing, Type.Missing, Type.Missing, Type.Missing, Type.Missing, Type.Missing, Type.Missing, Type.Missing, Type.Missing, Type.Missing, Type.Missing, Type.Missing);提示 如果您是一名 C# 开发人员,您将习惯于在方法调用中看到对 Type.Missing 值的引用。因为 Excel 对象模型是以 VBA 为目标编写的,所以它的许多方法接受可选参数 — 有时达到 30 个可选参数。您将需要使用 Type.Missing 值的许多实例,或者提供每个参数的特定默认值。
| | • | 以工作簿的形式打开一个文本文件、数据库或 XML 文件(使用 OpenText、OpenDatabase 或 OpenXml )。这些方法提供了极大的灵活性,但即使是对它们进行简单的介绍,也会占用比这里安排的多得多的篇幅。就现在而言,您知道这些方法存在就足够了 — 如果您需要将这些项中的任何一个加载到 Excel 中,您可以更仔细地研究这些项。您可以使用如下代码以工作簿的形式加载一个文本文件(使用逗号作为分隔符,从文本文件中的第三行开始):
' Visual BasicDim wb as Excel.Workbook = _ ThisApplication.Workbooks.OpenText("C:/Test.txt", StartRow:=3, _ DataType:=xlDelimited, Comma:=True)// C#Excel.Workbook wb = ThisApplication.Workbooks.OpenText("C://Test.txt", Type.Missing, 3, Excel.XlTextParsingType.xlDelimited, Excel.XlTextQualifier.xlTextQualifierDoubleQuote, Type.Missing, Type.Missing, Type.Missing, True, Type.Missing, Type.Missing, Type.Missing, Type.Missing, Type.Missing, Type.Missing, Type.Missing, Type.Missing, Type.Missing); | | • | 引用单个工作簿。您可以使用整数(指示在集合中的位置)或工作簿名作为 Workbooks 集合中的索引。然而,如果您想要通过名称引用工作簿,您将需要注意对其进行引用的方法:您必须使用您在标题栏看到的名称,在保存该文件之前,这个名称不包括“.xls”扩展名:
' Visual BasicDim wb As Excel.Workbook = ThisApplication.Workbooks(1)' Before Book1 is saved:wb = ThisApplication.Workbooks("Book1")' After Book1 is saved:wb = ThisApplication.Workbooks("Book1.xls")// C#Excel.Workbook wb = ThisApplication.Workbooks[1];// Before Book1 is saved:wb = ThisApplication.Workbooks["Book1"];// After Book1 is saved:wb = ThisApplication.Workbooks["Book1.xls"];提示 当您引用特定的工作簿时,您利用的是默认的索引器(Item 属性)。除了 Item 属性之外,Workbooks 集合像 Microsoft Office 提供的所有集合一样,包括 Count 属性,Count 属性返回集合中的项(本例中的Workbooks)的数目。
|
执行操作的成员Application 对象提供了许多允许您执行操作(从重新计算当前数据到撤销对数据的更改)的方法。下表枚举了Application 对象的一些方法,并且使用了一些小例子对每个方法进行了描述。这一部分的示例出现在示例工作簿中的 ApplicationObject 工作表内:
| • | Calculate:强制重新计算所有打开的工作簿、特定的工作簿或者特定的范围:
' Visual BasicThisApplication.Calculate' Or...ThisWorkbook.Calculate' Or...ThisApplication.Range("SomeNamedRange").Calculate// C#ThisApplication.Calculate();// Or...ThisWorkbook.Calculate();// Or...ThisApplication.get_Range("A1", "B12").Calculate();注 正如示例代码中所示,Range 和 Worksheet 对象也提供 Calculate 方法。使用可以将计算范围限定在您想要重新计算的最小单元格数内的对象的方法。Excel 中的重新计算引擎非常快,但是如果您可以限制所涉及到的单元格数,您就可以优化这一操作。只有在您想重新计算每个打开的工作簿中的每个未决更改时才使用Application.Calculate。
提示 Visual Basic .NET 和 C# 在处理 Excel 成员时并不完全一样。例如,Excel、VBA 和 Visual Basic .NET 中的Range 属性在 C# 中只能通过 get_Range 方法进行访问。在本文中,您将会发现此访问器成员和其他访问器成员的一些例子。
| | • | Checkspelling:返回一个 Boolean 来指示提供的参数是否拼写正确。您可以选择提供一个自定义字典的名称和一个 Boolean 来指示您是否想要忽略大小写。下面的代码片段检查您所提供的值的拼写,并且在工作表上指示其结果:
' Visual BasicPrivate Sub TestSpelling() Dim rng As Excel.Range = _ ThisApplication.Range("CheckSpelling") Dim strOut As String If ThisApplication.CheckSpelling( _ rng.Offset(0, 1).Value.ToString) Then strOut = "Spelled correctly" Else strOut = "Spelled incorrectly" End If rng.Offset(0, 2).Value = strOutEnd Sub// C#private void TestSpelling(){ // If you specify only a named range in the call // to get_Range, use Type.Missing for the second parameter. Excel.Range rng = ThisApplication. get_Range("CheckSpelling", Type.Missing); // Note that C# requires you to retrieve and set // the Value2 property of the Range, rather than // the Value property, because the Value property // is parameterized, making it unavailable to C# code: rng.get_Offset(0, 2).Value2 = (ThisApplication.CheckSpelling( rng.get_Offset(0, 1).Value2.ToString(), Type.Missing, Type.Missing) ? "Spelled correctly" : "Spelled incorrectly");}提示 前面的代码片段使用了 Range 对象的 Offset 方法,到目前为止您还都没有遇到过。在本文后面讨论Range 对象的部分中将对这二者进行讨论。Range 类的使用很容易理解:Range 对象代表一个单元格或者一组单元格。在本例中,Range 对象引用已命名范围 CheckSpelling。Offset 属性从相关 Range 的左上角的指定行数和列数处返回一个 Range 对象,并且允许您处理相对于一个已知位置的单元格。
| | • | Evaluate:将 Excel 名称转换成实际的引用或值。这个方法允许您以字符串的形式创建引用,并且在需要时将其转换成一个实际对象引用,或者求表达式的值。下面的示例允许您将单元格的地址输入到示例工作表中,并且该代码将文本放到您指定地址的单元格中:
' Visual BasicPrivate Sub TestEvaluate() Dim rng As Excel.Range = _ ThisApplication.Range("Evaluate") Try Dim rngNew As Excel.Range = _ ThisApplication.Evaluate( _ DirectCast(rng.Offset(0, 1).Value), Excel.Range) rngNew.Value = "Hello, World!" Catch ex As Exception MessageBox.Show(ex.Message, ThisApplication.Name) End TryEnd Sub// C#private void TestEvaluate(){ Excel.Range rng = ThisApplication. get_Range("Evaluate", Type.Missing); try { Excel.Range rngNew = (Excel.Range) ThisApplication.Evaluate( rng.get_Offset(0, 1).Value2); rngNew.Value2 = "Hello, World!"; } catch (Exception ex) { MessageBox.Show(ex.Message, ThisApplication.Name); }} | | • | MailSystem、MailSession、MailLogoff、MailLogon 和 SendMail:这些成员允许您登录您所安装的电子邮件系统、将当前的工作簿作为附件发送、以及从您所安装的电子邮件系统中注销。MailSystem 属性指出已安装的电子邮件系统,而 MailSession 属性返回对当前电子邮件会话(如果有活动的会话,您就不需要登录)的引用。下面的示例将示例工作簿作为一个简单的电子邮件消息的附件发送:
' Visual BasicPrivate Sub TestEmail() If ThisApplication.MailSystem = Excel.XlMailSystem.xlMAPI Then If ThisApplication.MailSession Is Nothing Then Dim frm As New SendMail If frm.ShowDialog = DialogResult.OK Then ThisApplication.MailLogon( _ frm.EmailName, frm.EmailPassword, frm.DownloadNewMail) End If End If Dim strEmail As String = _ ThisApplication.Range("SendMail").Offset(0, 1). _ Value.ToString ThisWorkbook.SendMail(strEmail, "Sample Excel Email") ThisApplication.MailLogoff() Else MessageBox.Show( _ "This demonstration works only if MAPI is installed.") End IfEnd Sub// C#private void TestEmail(){ if (ThisApplication.MailSystem == Excel.XlMailSystem.xlMAPI ) { if ( ThisApplication.MailSession == null ) { SendMail frm = new SendMail(); if (frm.ShowDialog() == DialogResult.OK ) { ThisApplication.MailLogon(frm.EmailName, frm.EmailPassword, frm.DownloadNewMail); } } string strEmail = ThisApplication. get_Range("SendMail", Type.Missing). get_Offset(0, 1).Value2.ToString(); ThisWorkbook.SendMail(strEmail, "Sample Excel Email", Type.Missing); ThisApplication.MailLogoff(); } else { MessageBox.Show("This demonstration works only if " + "MAPI is installed."); }}注:Workbook 类提供了 SendMail 方法;这是很有意义的,因为可以通过电子邮件发送的最小粒度的对象就是工作簿本身。您会注意到,SendMail 方法并没有提供任何将文本附加到您所发送的消息的方法,并且寻址方面也不够灵活。很明显,提供这些成员只是使通过电子邮件发送一个工作簿变得容易。如果您想获得功能更加齐全的支持,则您需要研究其他与电子邮件交互的方法。此外,如果您当前不在线,并且没有连接到您的电子邮件系统,则上面的示例代码将失败。如果 MailSession 属性没有返回任何结果,则您可以处理这种失败情况,并且不再尝试发送邮件。
| | • | Quit:允许您通过编程方式退出 Excel。如果您将 DisplayAlerts 属性设置为 False,则系统不会提示您保存任何未保存的数据。此外,如果您将 Workbook 的 Saved 属性设置为 True,则不管您有没有进行更改,Excel 都不会提示您保存它:
' Visual BasicThisApplication.Quit// C#ThisApplication.Quit(); | | • | Undo:取消用户在用户界面内进行的最后一次操作。这个方法不会对代码进行的操作产生影响,并且只能撤销单个操作。这项功能并不是十分的强大,但是它确实可以使您在执行您的代码之前撤销用户进行的最后一次操作:
' Visual BasicThisApplication.Undo// C#ThisApplication.Undo(); |
处理文件操作的成员Application 对象提供了几个成员,通过这些成员,您可以与 Excel 应用程序的上下文内的文件系统交互。下面几部分描述了您可能会使用到的一些成员。(这部分所描述的示例在示例工作簿的 Application File Handling 工作表中。)
DefaultFilePath 属性
这个简单的属性获取或者设置 Excel 用于加载和保存文件的路径:
' Visual Basic' When the workbook opens:ThisApplication.Range("DefaultFilePath").Value = _ ThisApplication.DefaultFilePath' When you save the DefaultFilePath property:ThisApplication.DefaultFilePath = _ ThisApplication.Range("DefaultFilePath"). _ Value.ToString// C#// When the workbook opens:ThisApplication.get_Range("DefaultFilePath", Type.Missing). Value2 = ThisApplication.DefaultFilePath;// When you save the DefaultFilePath property:ThisApplication.DefaultFilePath = ThisApplication.get_Range("DefaultFilePath", Type.Missing). Value2.ToString();DefaultSaveFormat 属性
此属性获取或者设置保存工作簿的默认格式。Excel 为此属性提供了大量的选项,这些选项都是 XlFileFormat 枚举的成员。示例工作簿允许您从可选项中进行选择,如图 1 所示。下面的代码片段演示了示例如何加载和保存此属性的值。
在这个例子中,示例工作表中的列 E 包含 XlFileFormat 枚举(在名为“XlFileFormat”的范围中)的所有可能的值的名称列表,而列 F 包含相应的整数值。图 2 展示了这两个列的一个子集。DefaultSaveFormat 命名范围(在图1 中)包含对 XlFileFormat 范围的引用,这使得您可以从一个列表中进行选择。一旦您选择保存该值,代码就必须使用 Range.Find 方法找到您已经选择的字符串,然后使用 Range.Offset 方法以您找到的值的指定偏移量返回一个值。(有关 Range.Find 方法的详细信息,请参阅本文后面标题为“在范围内搜索”的部分。)最后,代码将整数值(转换成适当的枚举类型)重新保存到 DefaultSaveFormat 属性。
检索 DefaultSaveFormat 的当前值非常简单。下面的代码将值转换成文本,并且在示例工作表上的正确 Range中显示它:
' Visual Basic' When the workbook opens, convert the enumerated value ' into a string:ThisApplication.Range("DefaultSaveFormat").Value = _ ThisApplication.DefaultSaveFormat.ToString// C#// When the workbook opens, convert the enumerated value // into a string:ThisApplication.get_Range("DefaultSaveFormat", Type.Missing). Value2 = ThisApplication.DefaultSaveFormat.ToString();重新赋选定的值要困难一些。这涉及到三个步骤。代码必须处理下列任务:
从工作表上的 DefaultSaveFormat 范围检索选择的保存格式的名称:
' Visual Basic' Retrieve the name of the new save format, as a string:Dim strSaveFormat As String = _ ThisApplication.Range("DefaultSaveFormat"). _ Value.ToString()// C#// Retrieve the name of the new save format,// as a string:string strSaveFormat = ThisApplication. get_Range("DefaultSaveFormat", Type.Missing). Value2.ToString();在工作表上临近 XlFileFormat 范围的列中查找相匹配的整数值(调用 Range 类的 Find 方法)。然后,代码使用Range.Offset 属性来检索右边一列的值:
' Visual BasicDim intSaveFormat As Integer = _ CType(ThisApplication.Range("XlFileFormat"). _ Find(strSaveFormat).Offset(0, 1).Value, Integer)// C#Excel.Range rng = ThisApplication. get_Range("xlFileFormat", Type.Missing);Excel.Range rngFind = rng.Find(strSaveFormat, Type.Missing, Type.Missing, Type.Missing, Type.Missing, Excel.XlSearchDirection.xlNext, Type.Missing, Type.Missing, Type.Missing);// In C#, use the get_Offset method instead of the Offset property:int intSaveFormat = Convert.ToInt32(rngFind.get_Offset(0, 1).Value2);将整数值重新赋值给 DefaultSaveFormat 属性:
' Visual BasicThisApplication.DefaultSaveFormat = _ CType(intSaveFormat, Excel.XlFileFormat)// C#ThisApplication.DefaultSaveFormat = Excel.XlFileFormat) intSaveFormat;
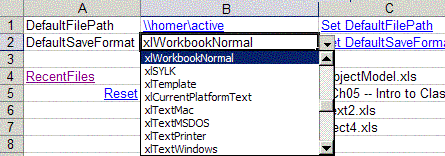
图 1. 从可用类型的列表中选择一种文件格式。
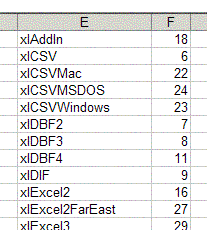
图 2. 示例工作表上的 XlFileFormat 范围的一个子集。
RecentFiles 属性
RecentFiles 属性返回一个字符串的集合,包含出现在“文件”菜单的最近使用的文件列表内的所有文件的名称。这个列表的长度将随着用户已经选择保留的文件的数目的变化而变化。示例工作簿在其打开时调用这一过程,将最近的文件列表复制到示例工作表上一个名为 RecentFiles 的范围中:
' Visual BasicPrivate Sub ListRecentFiles() Dim i As Integer Dim rng As Excel.Range = DirectCast( _ ThisApplication.Range("RecentFiles"). _ Cells(1, 1), Excel.Range) For i = 1 To ThisApplication.RecentFiles.Count rng.Offset(i - 1, 0).Value = _ ThisApplication.RecentFiles(i).Name NextEnd Sub// C#private void ListRecentFiles(){ Excel.Range rng = (Excel.Range)ThisApplication. get_Range("RecentFiles", Type.Missing).Cells[1, 1]; for (int i = 1; i <= ThisApplication.RecentFiles.Count; i++) { rng.get_Offset(i - 1, 0).Value2 = ThisApplication.RecentFiles.Name; } }FileDialog 属性
FileDialog 属性返回 FileDialog 对象,这个对象处理四种类型的文件操作。由该属性返回的这个 FileDialog 对象允许您:
| • | 选择一个文件,并且将其打开。
| | • | 选择一个文件位置,并且保存当前工作簿。
| | • | 选择一个文件夹。
| | • | 选择一个文件名。
|
通过使用这个对话框,您可以利用 Microsoft Office 提供的所有文件处理功能。FileDialog 属性需要您通过传递给它一个 msoFileDialogType 枚举值(msoFileDialogFilePicker、msoFileDialogFolderPicker、msoFileDialogOpen 或msoFileDialogSaveAs)来选择对话框的特定使用。然后,您就可以与这个属性返回的 FileDialog 对象进行交互了。
与许多其他的对象相似,FileDialog 对象是由 Microsoft.Office.Core 命名空间提供的。为了避免键入每个 Office 对象的完整路径,示例项目使用 Imports 或 using 语句来导入这个命名空间。本文中的代码片段还假定您已经将适当的命名空间引用添加到您的文件中了:
' Visual Basic Imports Office = Microsoft.Office.Core// C#using Office = Microsoft.Office.Core;FileDialog 对象的 Show 方法显示对话框,并且返回 -1(如果您按 OK)和 0(如果您按 Cancel)。如果您已经使用了 msoFileDialogOpen 或 msoFileDialogSaveAs 枚举值,您可以使用该类的 Execute 方法来实际打开或者保存文件。SelectedItems 属性包含一个字符串的集合,每个字符串代表一个选择的文件名。
例如,下面来自示例工作簿的代码提示您打开一个新的工作簿。这个代码片段允许多重选择、清除可用筛选器的列表、添加两个新的筛选器,然后显示对话框,如图 3 所示。如果您选择一个文件或多个文件,则代码会调用FileDialog 对象的 Execute 方法来打开请求的文件:
' Visual BasicWith ThisApplication.FileDialog( _ Office.MsoFileDialogType.msoFileDialogOpen) .AllowMultiSelect = True .Filters.Clear .Filters.Add "Excel Files", "*.xls;*.xlw" .Filters.Add "All Files", "*.*" If .Show <> 0 Then .Execute End IfEnd With// C#dlg = ThisApplication.get_FileDialog( Office.MsoFileDialogType.msoFileDialogOpen);dlg.Filters.Clear();dlg.Filters.Add("Excel Files", "*.xls;*.xlw", Type.Missing);dlg.Filters.Add("All Files", "*.*", Type.Missing);if(dlg.Show() != 0) dlg.Execute();
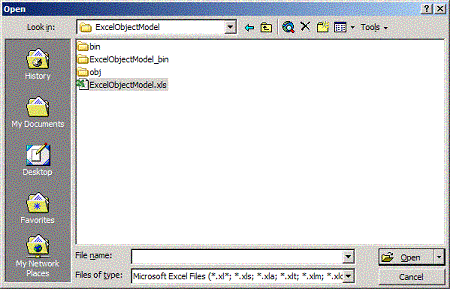
图 3. 使用 FileDialog 类来显示标准 File Open 对话框。
下面来自示例的代码片段演示了您可以如何使用该对话框来选择一个文件夹:
' Visual BasicWith ThisApplication.FileDialog( _ Office.MsoFileDialogType.msoFileDialogFolderPicker) If .Show <> 0 Then ThisApplication.Range("FolderPickerResults"). _ Value = .SelectedItems.Item(1) End IfEnd With// C#dlg = ThisApplication.get_FileDialog( Office.MsoFileDialogType.msoFileDialogFolderPicker);if (dlg.Show() != 0){ ThisApplication.get_Range("FolderPickerResults", Type.Missing). Value2 = dlg.SelectedItems.Item(1);}注Application 对象还提供了 GetOpenFileName 和 GetSaveAsFileName 方法,这些方法允许您选择一个要打开的文件的文件名。尽管您可以使用这些方法,但是您将发现 Microsoft .NET Framework 提供的相对应的OpenFileDialog 和 SaveFileDialog 控件功能更加丰富,而且更加易于使用。
其他有用的成员Application 对象提供了一些不适用于其他种类的成员,例如 WorksheetFunction 属性、Names 集合和Windows 集合。下面几部分将描述这些成员。
WorksheetFunction 类
Application 对象包含一个属性 WorksheetFunction,这个属性返回 WorksheetFunction 类的实例。这个类提供了许多共享/静态方法,其中的每个方法都包装了一个 Excel 工作表函数。这些方法中的每一个都公开许多 Excel 电子表格计算函数中的一个,而 VBA 没有提供这些函数。而且其中的一些成员在 Visual Basic .NET 和 C# 的运算符和方法中已经具备,因此您不大可能会使用这些成员(例如,And 方法)。
您在 WorksheetFunction 类的方法中将会发现大量有趣的和有用的函数,总结在下面的列表中:
| • | 数学函数,例如 Acos、Acosh、Asin、Asinh、Cosh、Degrees、Ln、Log、Median、Max、Min、Mode、Radians 等等。
| | • | 域函数,允许您对范围执行运算,例如 DAverage、DCount、DCountA、DGet、DMax、DMin、DProduct、DSum 等等。
| | • | 逻辑函数,例如 IsErr、IsError、IsLogical、IsNA、IsNonText、IsNumber、IsText。
| | • | 统计函数,例如 BetaDist、BinomDist、ChiTest、ChiInv、LogNormDist、NegBinomDist、Pearson、SumProduct、SumSq、TDist、TTest, Var、VarP 等等。
| | • | 电子表格函数,在 .NET Framework 中,您不大可能会使用这些函数,例如 And、Or、Choose 等等。
| | • | 与泰国有关的函数:您将会发现大量使人莫名其妙的函数,这些函数用于处理泰国数字、日历和货币(谣传 Excel 小组曾经特别喜欢吃泰国食品,因而添加了这些函数来帮助计算他们在当地泰国餐馆的餐费,但是现在看来这个谣言是不真实的),例如BahtText、IsThaiDigit、ThaiDayOfWeek、ThaiDigit、ThaiMonthOfYear、ThaiNumSound、ThaiNumString、ThaiStringLength、ThaiYear、RoundBahtDown和 RoundBahtUp。
|
在 Visual Studio .NET 项目中,利用 WorksheetFunction 类非常容易。因为项目模板为您提供了ThisApplication 对象,您可以简单地引用该对象的 WorksheetFunction 属性。示例应用程序包含一个名为Other Application Members 的工作表,如图 4 所示,这个示例只测试了这个类的几个成员。
注WorksheetFunction 类及其成员提供了一个好例子,说明了为什么从 Visual Basic 中使用 Excel 对象要比从 C# 中使用等效的代码容易得多。WorksheetFunction 类的许多方法要求 C# 开发人员传递 30 个参数,其中的大多数为空。当然,通过编写封装各种不同的方法组(一些具有一个必需的参数,一些具有两个必需的参数,等等)的包装无疑可以减轻这种负担。出于本文的目的,代码调用“裸”方法,而不使用包装方法。当然,C# 代码很难看。
单击 DemonstrateWorksheetFunction 链接运行下面的代码(有关 Sort 方法的详细信息,请参阅“对范围内的数据进行排序”部分):
' Visual BasicPrivate Sub TestWorksheetFunction() Dim ws As Excel.Worksheet = _ DirectCast(ThisWorkbook.ActiveSheet, Excel.Worksheet) Dim rng As Excel.Range = ws.Range("RandomNumbers") Dim rnd As New System.Random Dim i As Integer For i = 1 To 20 ws.Cells(i, 2) = rnd.Next(100) Next i rng.Sort(rng, _ Orientation:=Excel.XlSortOrientation.xlSortColumns) With ThisApplication.WorksheetFunction ws.Range("Min").Value = .Min(rng) ws.Range("Max").Value = .Max(rng) ws.Range("Median").Value = .Median(rng) ws.Range("Average").Value = .Average(rng) ws.Range("StDev").Value = .StDev(rng) End WithEnd Sub// C#private void TestWorksheetFunction() { Excel.Worksheet ws = (Excel.Worksheet) ThisWorkbook.ActiveSheet; Excel.Range rng = ws.get_Range("RandomNumbers", Type.Missing); System.Random rnd = new System.Random(); for ( int i = 1 ; i <= 20; i++) ws.Cells[i, 2] = rnd.Next(100); rng.Sort(rng, Excel.XlSortOrder.xlAscending, Type.Missing, Type.Missing, Excel.XlSortOrder.xlAscending, Type.Missing, Excel.XlSortOrder.xlAscending, Excel.XlYesNoGuess.xlNo, Type.Missing,Type.Missing, Excel.XlSortOrientation.xlSortColumns, Excel.XlSortMethod.xlPinYin, Excel.XlSortDataOption.xlSortNormal, Excel.XlSortDataOption.xlSortNormal, Excel.XlSortDataOption.xlSortNormal); Excel.WorksheetFunction wsf = ThisApplication.WorksheetFunction; ws.get_Range("Min", Type.Missing).Value2 = wsf.Min(rng, Type.Missing, Type.Missing, Type.Missing, Type.Missing, Type.Missing, Type.Missing, Type.Missing, Type.Missing, Type.Missing, Type.Missing, Type.Missing, Type.Missing, Type.Missing, Type.Missing, Type.Missing, Type.Missing, Type.Missing, Type.Missing, Type.Missing, Type.Missing, Type.Missing, Type.Missing, Type.Missing, Type.Missing, Type.Missing, Type.Missing, Type.Missing, Type.Missing, Type.Missing); ws.get_Range("Max", Type.Missing).Value2 = wsf.Max(rng, Type.Missing, Type.Missing, Type.Missing, Type.Missing, Type.Missing, Type.Missing, Type.Missing, Type.Missing, Type.Missing, Type.Missing, Type.Missing, Type.Missing, Type.Missing, Type.Missing, Type.Missing, Type.Missing, Type.Missing, Type.Missing, Type.Missing, Type.Missing, Type.Missing, Type.Missing, Type.Missing, Type.Missing, Type.Missing, Type.Missing, Type.Missing, Type.Missing, Type.Missing); ws.get_Range("Median", Type.Missing).Value2 = wsf.Median(rng, Type.Missing, Type.Missing, Type.Missing, Type.Missing, Type.Missing, Type.Missing, Type.Missing, Type.Missing, Type.Missing, Type.Missing, Type.Missing, Type.Missing, Type.Missing, Type.Missing, Type.Missing, Type.Missing, Type.Missing, Type.Missing, Type.Missing, Type.Missing, Type.Missing, Type.Missing, Type.Missing, Type.Missing, Type.Missing, Type.Missing, Type.Missing, Type.Missing, Type.Missing); ws.get_Range("Average", Type.Missing).Value2 = wsf.Average(rng, Type.Missing, Type.Missing, Type.Missing, Type.Missing, Type.Missing, Type.Missing, Type.Missing, Type.Missing, Type.Missing, Type.Missing, Type.Missing, Type.Missing, Type.Missing, Type.Missing, Type.Missing, Type.Missing, Type.Missing, Type.Missing, Type.Missing, Type.Missing, Type.Missing, Type.Missing, Type.Missing, Type.Missing, Type.Missing, Type.Missing, Type.Missing, Type.Missing, Type.Missing); ws.get_Range("StDev", Type.Missing).Value2 = wsf.StDev(rng, Type.Missing, Type.Missing, Type.Missing, Type.Missing, Type.Missing, Type.Missing, Type.Missing, Type.Missing, Type.Missing, Type.Missing, Type.Missing, Type.Missing, Type.Missing, Type.Missing, Type.Missing, Type.Missing, Type.Missing, Type.Missing, Type.Missing, Type.Missing, Type.Missing, Type.Missing, Type.Missing, Type.Missing, Type.Missing, Type.Missing, Type.Missing, Type.Missing, Type.Missing);}
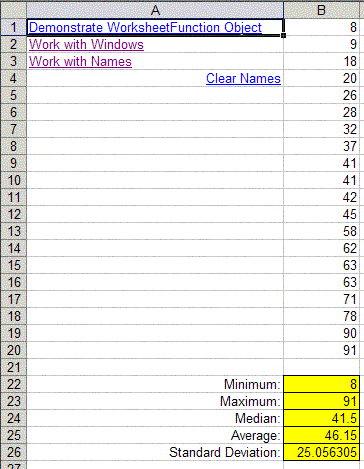
图 4. 选择 WorksheetFunction 工作表来检验 WorksheetFunction 类及其有用的方法。
正如您在示例代码中看到的,您可以把 Range 对象作为参数传递给 WorksheetFunction 方法。此外,您也可以将单值或值列表作为参数进行传递。这些方法通常可接受多达 32 个参数,因此,如果您想要计算一个固定的数字列表的平均值,您可以使用如下代码:
' Visual BasicdblAverage = ThisApplication.WorksheetFunction.Average( _ 12, 14, 13, 19, 21)// C#// Note the number of Type.Missing values--the method accepts// 30 parameters.dblAverage = ThisApplication.WorksheetFunction.Average( 12, 14, 13, 19, 21, Type.Missing, Type.Missing, Type.Missing, Type.Missing, Type.Missing, Type.Missing, Type.Missing, Type.Missing, Type.Missing, Type.Missing, Type.Missing, Type.Missing, Type.Missing, Type.Missing, Type.Missing, Type.Missing, Type.Missing, Type.Missing, Type.Missing, Type.Missing, Type.Missing, Type.Missing, Type.Missing, Type.Missing, Type.Missing);Window 类和 Windows 集合
正如您可能期望的,Application 对象提供了对 Excel 应用程序内显示的窗口的控制,并且您可以使用Application 对象的 Windows 属性来打开、关闭和排列 Excel 对象窗口。
Windows 属性返回 Window 对象的集合,并且您可以调用 Arrange 方法来排列所有打开的窗口(或者只是可见的窗口)。指定一个 XlArrangeStyle 枚举值来指示您想要以何种方式排列窗口,并且还可以选择指定一些关于您是否只想排列可见的窗口、以及您想如何同步窗口滚动的信息。例如,要在 Excel 工作区中平铺显示窗口,您可以使用如下代码:
' Visual BasicThisApplication.Windows.Arrange( _ Excel.XlArrangeStyle.xlArrangeStyleTiled)// C#ThisApplication.Windows.Arrange( Excel.XlArrangeStyle.xlArrangeStyleTiled, Type.Missing, Type.Missing, Type.Missing);如果您想要通过编程方式创建一个新的窗口,您可以调用工作簿的 NewWindow 方法,例如:
' Visual BasicThisWorkbook.NewWindow()// C#ThisWorkbook.NewWindow();因为 NewWindow 方法返回 Window 对象,所以您也可以编写如下代码,它设置新窗口的标题,然后并将其激活:
' Visual BasicWith ThisWorkbook.NewWindow() .Caption = "New Window" .Activate()End With// C#Excel.Window wnd = ThisWorkbook.NewWindow();wnd.Caption = "New Window";wnd.Activate();Windows 类提供控制相关窗口的外观和行为的属性和方法,包括颜色、标题、窗口特性的可视性、以及滚动行为。您可以编写如下代码来使用特定窗口的属性:
' Visual BasicWith ThisApplication.Windows(3) .GridlineColor = ColorTranslator.ToOle(Color.Red) .Caption = "A New Window" .DisplayHeadings = False .DisplayFormulas = False .DisplayWorkbookTabs = False .SplitColumn = 1End With// C#wnd = ThisApplication.Windows[3];wnd.GridlineColor = ColorTranslator.ToOle(Color.Red);wnd.Caption = "A New Window";wnd.DisplayHeadings = false;wnd.DisplayFormulas = false;wnd.DisplayWorkbookTabs = false;wnd.SplitColumn = 1;提示 虽然 VBA 和 .NET 都通过相似的范式使用颜色 — 每种都使用三个一组的字节,包含颜色中红、绿和蓝组成部分,编码成 32 位整数的三个低位字节 — 但是它们处理颜色的方式不同。您可以使用System.Drawing.ColorTranslator.ToOle 方法从 .NET 颜色转换到 VBA 所需的 OLE 颜色。
单击 Other Application Members 工作表上的 Work with Windows 会运行示例程序 TestWindows,它包含这一部分中以小程序块的形式提供的所有代码。单击相同的工作表中的 Reset Windows 会运行下面的过程,它将关闭除了第一个窗口以外的所有窗口,然后把第一个窗口最大化:
' Visual BasicPrivate Sub ResetWindows() Dim i As Integer For i = ThisApplication.Windows.Count To 2 Step -1 ThisApplication.Windows(i).Close() Next ThisApplication.Windows(1).WindowState = _ Excel.XlWindowState.xlMaximizedEnd Sub// C#private void ResetWindows(){ for (int i = ThisApplication.Windows.Count; i >= 2; i--) ThisApplication.Windows.Close( false, Type.Missing, Type.Missing); ThisApplication.Windows[1].WindowState = Excel.XlWindowState.xlMaximized;}Name 类和 Names 集合
Application 对象提供了它的 Names 属性,这个属性返回 Name 对象的集合。每个 Name 对象都对应于 Excel 应用程序中的命名范围。有许多检索对命名范围的引用的方法 — 您可以使用 Workbook 对象的 Names 属性,也可以使用 Worksheet 对象的 Names 属性。
为了创建一个新的命名范围,可以使用 Names 集合的 Add 方法,如下面的代码片段所示。除了两个必需的参数之外,Add 方法还接受许多可选的参数:
' Visual BasicDim nm As Excel.Namenm = ThisApplication.Names.Add( _ "NewName", "='Other Application Members'!$A$6")// C#Excel.Name nm;nm = ThisApplication.Names.Add( "NewName", @"='Other Application Members'!$A$6", Type.Missing, Type.Missing, Type.Missing, Type.Missing, Type.Missing, Type.Missing, Type.Missing, Type.Missing, Type.Missing);指定名称和位置(以及其他可选的参数),然后,您就可以在您的代码中引用该范围:
' Visual Basic ThisApplication.Range("NewName").Value = "Hello, World!"// C#ThisApplication.get_Range( "NewName", Type.Missing).Value2 = "Hello, World!";为了检索有关命名范围的信息,您可以使用 Name 类的各种属性。下面的列表描述了一些最常用的成员:
| • | Name 返回分配给命名范围的名称。
| | • | RefersTo 以标准格式 ("=SheetName!$B$25") 返回一个包含实际目标地址的字符串。
| | • | RefersToR1C1 以“R1C1”格式 ("=SheetName!R25C2") 返回目标地址。
| | • | Value 返回对解析为范围的内容的命名范围的引用。
|
单击示例中的 Work with Names 链接运行下面的代码,用关于所有命名范围的信息填充工作表的一个区域:
' Visual BasicDim nm As Excel.NameDim rng As Excel.Range = ThisApplication.Range("Names")Dim i As IntegerFor i = 0 To ThisApplication.Names.Count – 1 nm = ThisApplication.Names.Item(i + 1) rng.Offset(i, 0).Value = nm.Name ' Without the leading "'", these references ' get evaluated, rather than displayed directly. rng.Offset(i, 1).Value = "'" & nm.RefersTo.ToString rng.Offset(i, 2).Value = "'" & nm.RefersToR1C1.ToString rng.Offset(i, 3).Value = nm.ValueNext i// C#Excel.Range rng = ThisApplication.get_Range("Names", Type.Missing);for ( int i = 0 ; i <= ThisApplication.Names.Count - 1; i++){ nm = ThisApplication.Names.Item(i + 1, Type.Missing, Type.Missing); rng.get_Offset(i, 0).Value2 = nm.Name; // Without the leading "'", these references // get evaluated, rather than displayed directly. rng.get_Offset(i, 1).Value2 = "'" + nm.RefersTo.ToString(); rng.get_Offset(i, 2).Value2 = "'" + nm.RefersToR1C1.ToString(); rng.get_Offset(i, 3).Value2 = nm.Value;}Application 事件除了 Application 类提供的所有其他方法之外,您还将发现有一大组事件可用。虽然不可能以任何一种一致的方式演示所有事件,但是单单根据名称,就可以比较清楚地知道它们的用途。下面几部分描述了这些事件的一个子集,并讨论了在您自己的应用程序中最可能使用的事件。
提示 传递给 Office 应用程序中的事件处理程序的参数会让人感到与用在本机 .NET 事件中的参数不同。通常,.NET 事件处理程序总是接收 Object 变量(该变量引用引发事件的对象)和第二个参数(该参数从EventArgs 基类继承而来,包含关于事件的额外信息)。没有这样定义良好的事件设计模式用于 Office 应用程序,因此每个事件处理程序都接受任意数目的参数(由最初的开发人员定义)。
表行为
Application 对象提供了各种与表(包括图表和工作表)相关的事件。下面的列表包含关于许多这样的事件的信息:
| • | 当任何一个表被激活时,SheetActivate 都会发生。Excel 将一个包含对被激活的表的引用的 Object 变量传递给事件处理程序。
提示 正如 Excel 中传递一个引用表的 Object 的任何情况一样,在可以使用这个引用之前,您需要将引用强制转换成一个正确类型(Worksheet 或 Chart,视具体的情况而定)的变量。然而,如果您已经禁用了 Visual Basic .NET 中的 Option Strict 设置,您可以利用晚期绑定。在您键入时,您将仍然不能利用 IntelliSense,这使得编写代码变得更加困难。本文档中所有在 Sheets 集合内使用项的示例都显式地将结果强制转换成所需要的特定类型的表(Worksheet 或 Chart)。
| | • | 在 Excel 提供默认的双击处理之前,当任何表被双击时,SheetBeforeDoubleClick 都会发生。Excel 将下列参数传递给事件处理程序:一个包含对表的引用的 Object 变量、一个包含离双击位置最近的单元格的 Range 对象、一个允许您取消默认事件处理的 Boolean 值(默认为 False)。(此事件没有出现在图表中。)
提示 所有在它们的名称中包括单词“Before”的事件都允许您取消默认的事件处理。传递给您的事件处理程序的参数通常名为 Cancle,具有默认值 False。如果将这个参数设置为 True,Excel 将不会执行事件的默认处理。
| | • | 在 Excel 提供默认的右键单击处理之前,当任何表被右键单击时,SheetBeforeRightClick 都会发生。Exce 将下列参数传递给事件处理程序:一个包含对表的引用的 Object 变量、一个包含离右击位置最近的单元格的 Range对象、一个允许您取消默认事件处理的 Boolean 值(默认为 False)。(此事件没有出现在图表中。)
| | • | 当任何表被重新计算时,SheetCalculate 都会出现。Excel 将一个包含对重新计算的表的引用的 Object 传递给事件处理程序。
| | • | 当任何工作表中的单元格发生变化(通过用户或者通过运行代码)时,SheetChange 都会发生。Excel 将一个Object 变量(包含对表的引用)和一个 Range 变量(引用改变的范围)传递给事件处理程序。
| | • | 当任何表单被停用时(即当它不再有焦点时),SheetDeactivate 都会发生。只有当焦点转移到同一工作簿内的另一个表时,这个事件处理程序才会运行。Excel 将一个包含对已经停用的表的引用的 Object 变量传递给事件处理程序。
| | • | 当您单击任何工作簿内的任何超级链接时,SheetFollowHyperlink 都会发生。Excel 将一个引用包含此链接的表的 Object 变量和一个包含对您所单击的链接的引用的 Hyperlink 对象传递给事件处理程序。(示例项目使用了这个事件,从而在示例内提供了导航。)
| | • | 当工作表上的选择改变时,SheetSelectionChange 会发生(该事件没有出现在图表中)。Excel 将一个引用选择发生改变的表的 Object 变量和一个引用新选择的 Range 变量传递给事件处理程序。(注意,在最初的选择发生改变之前,Excel 没有传递关于最初的选择的信息。)
注 这一部分中的每个事件也可用作 Workbook 类提供的事件。如果该事件是由 Application 对象提供的,则它可以被 Excel 内当前打开的任何一个表引发。当它是由 Workbook 对象提供的,则该事件只有在它影响特定工作簿中的一个表时才会发生。此外,您还将发现 Worksheet 类提供的相同事件。在这种情况下,事件名不包含单词“Sheet”(例如,您将会找到 FollowHyperlink 而不是 SheetFollowHyperlink,等等),并且事件处理程序不传递对表的引用 — 这种信息隐含在接收事件的对象中。另外,事件及其使用方法和参数与此处您所看到的事件相同。
|
Window 行为
Application 对象(和相应的 Workbook 对象)提供了各种处理 Window 对象的行为的事件。下面的列表描述了这些事件:
| • | 当任何窗口被激活时,WindowActivate 都会发生。Excel 将下面两个参数传递给事件处理程序:一个是Workbook 对象,这个对象引用提供窗口的工作簿;一个是引用被选择的窗口的 Window 对象。与其他激活事件一样,这个事件也是只有在 Excel 内的焦点移动时才激发。切换到另一个应用程序,然后再回到 Excel 时,不会引发此事件。
| | • | 当任何窗口被停用时,WindowDeactivate 都会发生。有关更多信息,请参阅 WindowActivate 事件描述。
| | • | 当任何工作簿窗口重新调整大小时,WindowResize 都会发生。Excel 将一个引用提供窗口的工作簿的Workbook 对象和一个引用大小重新调整的窗口的 Window 对象传递给事件处理程序。
注由 Workbook 类提供的事件中,事件处理程序不会接收对 Workbook 的引用 — 这种信息隐含在引发此事件的对象中。
|
Workbook 管理
Application 对象提供了各种当您与任何 Workbook 对象交互时都会发生的事件。这些事件过程中的每一个都接收Workbook 变量,该变量指示参与事件的特定工作簿。下面的列表描述了可用事件的一个子集:
| • | 当创建一个新的工作簿时,NewWorkbook 会发生。Excel 将一个引用新的工作簿的 Workbook 变量传递给事件处理程序。(此事件只由 Application 类提供。)
| | • | 当任何工作簿被激活时,WorkbookActivate 都会发生。Excel 将一个引用被激活的工作簿的 Workbook 变量传递给事件处理程序。(与其他的“激活”事件一样,只有在您从一个工作簿切换到另一个工作簿时这个事件才发生。)
| | • | 当一个打开的工作簿刚好在默认事件处理之前关闭时,WorkbookBeforeClose 会发生。Excel 将一个引用将要关闭的工作簿的 Workbook 变量以及一个允许事件处理程序取消默认事件处理(即保持工作簿打开)的 Boolean值(默认为 False)传递给事件处理程序。
警告如果您草率地将 Cancel 参数设置为 True,而不考虑任何条件,则所有的工作簿将永远不会被关闭。
| | • | 当工作簿内的打印刚好在默认事件处理之前开始时,WorkbookBeforePrint 会发生。Excel 将一个引用包含打印内容的工作簿的 Workbook 变量以及一个允许事件处理程序取消默认事件处理(即跳过请求的打印)的 Boolean值(默认为 False)传递给事件处理程序。
| | • | 当刚好在默认事件处理之前保存工作簿时,WorkbookBeforeSave 会发生。Excel 将一个引用保存的工作簿的Workbook 变量以及一个允许事件处理程序取消默认事件处理(即取消保存)的 Boolean 值(默认为 False)传递给事件处理程序。
| | • | 当任何工作簿被停用时,WorkbookDeactivate 都会发生。Excel 将一个引用已经停用的工作簿的 Workbook 变量传递给事件处理程序。(与其他的“激活”事件一样,这个事件只有在您从一个工作簿切换到另一个工作簿时才会发生。)
| | • | 当将新的表添加到工作簿时,WorkbookNewSheet 会发生。Excel 将一个引用工作簿的 Workbook 变量和一个引用新表的 Object 变量传递给事件处理程序。
| | • | 当一个工作簿打开时,WorkbookOpen 会发生。Excel 将一个引用新打开的工作簿的 Workbook 变量传递给事件处理程序。
注Workbook 类提供了自己的一组事件,与您在此处看到的事件非常相似。所有以“Workbook”开头的事件在没有该委托(“Activate”而不是“WorkbookActivate”,等等)的情况下出现在 Workbook 类的事件列表中。Workbook 类事件处理程序不接收 Workbook 变量作为参数;该信息隐含在引发这个事件的对象中。此外,Workbook 类还提供了其他 Application 对象事件的镜像,但是只为单个工作簿捕获它们,这与为所有的工作簿捕获这些事件形成了对比。本文档的剩余部分将不讨论事件,因为您现在已经了解了一些您最有可能会使用的事件。
|
 返回页首
返回页首
Workbook 类正如您可能想象到的那样,Workbook 类代表了 Excel 应用程序内的一个单一的工作簿。在这一部分,您将会了解这个类的一些成员,包括那些最常使用的属性和方法。
提示 许多 Application 类的成员也作为 Workbook 类的成员加以介绍。在这种情况下,其属性适用于特定的工作簿,而不适用于活动工作簿。这一部分所要讨论的成员远比上一部分中讨论的少,主要因为您对许多提到的成员已经有所了解。
Workbook 类的属性Workbook 类提供了大量的属性(大约 90 个),并且有许多属性处理多数开发人员从不会考虑到的特殊情况;例如,AutoUpdateFrequency 属性返回共享工作簿的自动更新的分钟数;如果工作簿使用 1904 日期系统(一种日期顺序方案,它将 1904 年 1 月 2 日作为对应于值 1 的日期,通常使用于 Macintosh 计算机),Date1904 属性会返回 True 值;PasswordEncryptionAlgorithm 属性可以让您设置用于加密密码的确切算法,等等。
这一部分只是介绍您最可能用到的 Workbook 对象属性,而不是试图全面介绍其众多属性。通常的规则是:如果您需要工作簿的某一行为,而其他人可能已经请求该行为,实际上最可能的情况是一个属性允许该行为,而通常由一个方法提供该行为。在您向一个工作簿中添加自己的代码之前要仔细检查文档。
以下列表描述了一些最常使用的 Workbook 属性:
| • | Name、FullName、Path(字符串,只读):这些属性分别返回不同版本的工作簿名称。FullName 返回完整路径名称,包括工作簿文件名。Name 只是返回名称部分,而 Path 则只返回路径部分。单击示例工作簿中的 Name Information 链接来运行以下代码,并返回信息,如图 5 所示:
' Visual BasicThisApplication.Range("WorkbookName").Value = _ ThisWorkbook.NameThisApplication.Range("WorkbookPath").Value = _ ThisWorkbook.PathThisApplication.Range("WorkbookFullName").Value = _ ThisWorkbook.FullName// C#ThisApplication.get_Range("WorkbookName", Type.Missing). Value2 = ThisWorkbook.Name;ThisApplication.get_Range("WorkbookPath", Type.Missing). Value2 = ThisWorkbook.Path;ThisApplication.get_Range("WorkbookFullName", Type.Missing). Value2 = ThisWorkbook.FullName;

图 5. 使用 Workbook 属性检索名称的有关信息。
| | • | Password(字符串):获取或者设置和工作簿相关的密码。如果您指定了一个非空的密码,工作簿的HasPassword 属性也会返回 True。您可以检索 Password 属性,但是它的值总是“********”。单击示例工作簿中的 Set Password 链接来运行以下代码,它可以根据您是提供文本还是只提供空字符串来设置或清除工作簿密码。这个示例使用示例项目中名为 Password 的窗体,它提供一个文本框和一个 Password 属性:
' Visual BasicPrivate Sub SetPassword() Dim frm As New Password If frm.ShowDialog = DialogResult.OK Then ThisWorkbook.Password = frm.Password End If frm.Dispose()End Sub// C#private void SetPassword(){ Password frm = new Password(); if (frm.ShowDialog() == DialogResult.OK) ThisWorkbook.Password = frm.Value; frm.Dispose();} | | • | PrecisionAsDisplayed(布尔值):如果为 True,则 Excel使用以十进制显示的数字进行计算。如果为 False(默认值),则 Excel 使用所有可用的十进制数进行计算,甚至包括那些根本没有显示的部分。图 6 显示此属性设置成 True 的示例工作簿。第 C 列中的每个值都是第 B 列中值的副本,但是第 C 列中的数字格式已经设置成了只显示两个十进制位。要注意到,如果将 PrecisionAsDisplayed 属性设置成 True,求和就会不一样,因为经过四舍五入后实际值会不同。。如果您单击 PrecisionAsDisplayed= False 链接,求和又一样了。单击会调用以下过程,传递 True 或 False 值(取决于您所单击的链接):
' Visual BasicPrivate Sub TestPrecisionAsDisplayed( _ ByVal IsPrecisionAsDisplayedOn As Boolean) ThisWorkbook.PrecisionAsDisplayed = IsPrecisionAsDisplayedOnEnd Sub// C#private void TestPrecisionAsDisplayed( bool IsPrecisionAsDisplayedOn){ ThisWorkbook.PrecisionAsDisplayed = IsPrecisionAsDisplayedOn;}

图 6. 将PrecisionAsDisplayed 属性设置成 True,Excel 只使用显示的十进制数进行计算。
| | • | ReadOnly(布尔值,只读):如果工作簿以只读的方式打开,则此属性返回 True 值。此时如果您无法将数据保存到工作簿,那么您可以在应用程序中采取其他不同操作。
| | • | Saved(布尔值):用来获取或设置工作簿的保存状态。如果用户已经对工作簿的内容或结构进行了修改,则Saved 属性就为 True。如果试图关闭工作簿或者退出 Excel,将会出现一个警报提示您保存工作簿(除非您已经将 Application.DisplayAlerts 属性设置成 False)。如果您在代码中将 Saved 属性值设置成 False,Excel 就会认为您的工作簿已经保存,并且不会再次提醒您保存。
|
使用 Document 属性正如其他的 Office 应用程序一样,Excel 允许您在保存工作簿的同时保存文档属性。Excel 提供了许多内置属性,并且您也可以添加自己的属性。选择“文件|属性”来显示如图 7 所示的对话框,并且您也可以选择“自定义”选项卡来创建和修改自定义属性。
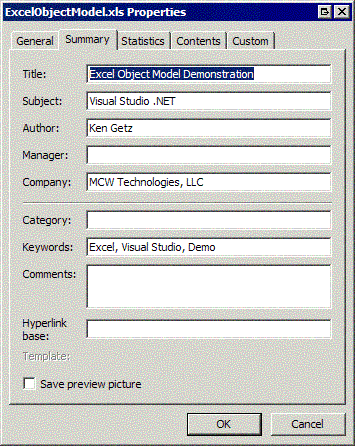
图 7. 使用此对话框设置文档属性。
通过 Workbook 类的 BuiltInDocumentProperties 属性来使用内置属性,并通过CustomDocumentProperties 属性来使用自定义属性。这些属性都返回一个 DocumentProperties 对象,它是DocumentProperty 对象的一个集合。通过集合内的名称或者索引可以使用集合的 Item 属性来检索特定的属性。在 Excel 文档中有全部的属性名列表,但是有一个检索列表的简单方法:当您单击示例工作簿中的 Document Properties 链接时会运行下面的过程(参见 图 8)。该过程调用 DumpPropertyCollection 方法列出所有内置属性和它们的当前值,然后对自定义属性也重复进行这一过程。此外,该过程还单独修改 Revision Number 属性,并且创建一个新的自定义属性:
' Visual BasicPrivate Sub DisplayDocumentProperties() Dim prp As Office.DocumentProperty Dim prps As Office.DocumentProperties Dim rng As Excel.Range = _ ThisApplication.Range("DocumentProperties") Dim i As Integer Try ThisApplication.ScreenUpdating = False Try prps = DirectCast( _ ThisWorkbook.BuiltinDocumentProperties, _ Office.DocumentProperties) ' Set the Revision Number property: prp = prps.Item("Revision Number") prp.Value = CType(prp.Value, Integer) + 1 ' Dump contents of the collection: DumpPropertyCollection(prps, rng, i) Catch ex As Exception MessageBox.Show(ex.Message) End Try ' Work with custom properties: Try prps = DirectCast( _ ThisWorkbook.CustomDocumentProperties, _ Office.DocumentProperties) DumpPropertyCollection(prps, rng, i) Catch ex As Exception MessageBox.Show(ex.Message) End Try ' Add a custom property: Try ' Delete the property, if it exists. prp = prps.Item("Project Name") prp.Delete() Catch ' Do nothing if you get an exception. End Try Try ' Add a new property. prp = prps.Add("Project Name", False, _ Office.MsoDocProperties.msoPropertyTypeString, _ "White Papers") Catch ex As Exception MessageBox.Show(ex.Message) End Try Finally ThisApplication.ScreenUpdating = True End TryEnd SubPrivate Sub DumpPropertyCollection( _ ByVal prps As Office.DocumentProperties, _ ByVal rng As Excel.Range, ByRef i As Integer) Dim prp As Office.DocumentProperty For Each prp In prps rng.Offset(i, 0).Value = prp.Name Try If Not prp.Value Is Nothing Then rng.Offset(i, 1).Value = _ prp.Value.ToString End If Catch ' Do nothing at all. End Try i += 1 NextEnd Sub// C#private void DisplayDocumentProperties(){ Office.DocumentProperty prp = null; Office.DocumentProperties prps = (Office.DocumentProperties) ThisWorkbook.BuiltinDocumentProperties; Excel.Range rng = ThisApplication. get_Range("DocumentProperties", Type.Missing); int i = 0; try { ThisApplication.ScreenUpdating = false; try { // Set the Revision Number property: prp = prps["Revision Number"]; prp.Value = Convert.ToInt32(prp.Value) + 1; // Dump contents of the collection: i = DumpPropertyCollection(prps, rng, i); } catch (Exception ex) { MessageBox.Show(ex.Message, ThisApplication.Name); } // Work with custom properties: try { prps = (Office.DocumentProperties) ThisWorkbook.CustomDocumentProperties; DumpPropertyCollection(prps, rng, i); } catch (Exception ex) { MessageBox.Show(ex.Message, ThisApplication.Name); } // Add a custom property: try { // Delete the property, if it exists. prp = prps["Project Name"]; prp.Delete(); } catch { // Do nothing if you get an exception. } try { // Add a new property. prp = prps.Add("Project Name", false, Office.MsoDocProperties.msoPropertyTypeString, "White Papers", Type.Missing); } catch (Exception ex) { MessageBox.Show(ex.Message, ThisApplication.Name); } } finally { ThisApplication.ScreenUpdating = true; }}private int DumpPropertyCollection( Office.DocumentProperties prps, Excel.Range rng, int i) { foreach (Office.DocumentProperty prp in prps) { rng.get_Offset(i, 0).Value2 = prp.Name; try { if (prp.Value != null ) { rng.get_Offset(i, 1).Value2 = prp.Value.ToString(); } } catch { // Do nothing at all. } i += 1; } return i;}提示 前面的代码示例 DisplayDocumentProperties 使用了 Microsoft.Office.Core 程序集中的几个枚举和类型。示例代码包含一个 Imports/using 语句,它将文本“Office”设置成这个命名空间的缩写,就像设置“Excel”缩写一样。项目模板会自动设置“Excel”缩写。而您需要自己添加“Office”语句。

图 8. 内置的文档属性
注 尽管在这里您使用的是 Excel 及其对象,但是实际上是 Office 提供了可用的内置文档属性列表,并且 Excel 没必要实现所有的属性 — 如果试图访问一个未定义属性的 Value 属性,就会触发一个异常。示例过程包含应付这种情况(如果会出现的话)的简单异常处理。
使用样式和 Word 文档很相似,Excel 工作簿允许您将指定的样式应用于工作簿内的区域,并且 Excel 提供了许多预定义的(尽管并不非常引人注目)样式。使用“格式|样式”菜单项,会显示一个对话框,它允许您交互式地修改样式,如图9 所示。
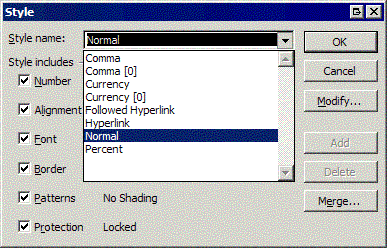
图 9. 利用此对话框交互式地修改样式。
单击“样式”对话框中的 Modify 会显示“单元格格式”对话框,如图 10 所示。
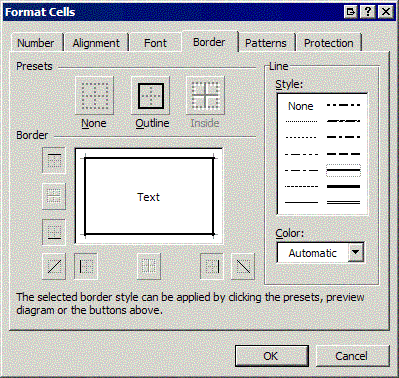
图 10. 使用“单元格格式”对话框修改样式。
“单元格格式”对话框显示了您在格式化单元格时可以使用的所有选项,该对话框中可用的所有选项同样可以在代码中使用。您可以使用 Workbook 对象的 Styles 属性来与工作簿交互,并对工作簿内的范围应用样式。
通过使用 Workbook 对象的 Styles 属性,您可以创建、删除和修改样式。单击示例工作簿中的 Apply Style 来运行以下过程,它创建了一个新的样式(如果您已经运行了这段代码,则使用已有的样式),设置该样式的各个方面,并将其应用到一个区域:
' Visual BasicPrivate Sub ApplyStyle() Const STYLE_NAME As String = "PropertyBorder" Dim rng As Excel.Range ' Get the range containing all the document properties. rng = GetDocPropRange() Dim sty As Excel.Style Try sty = ThisWorkbook.Styles(STYLE_NAME) Catch sty = ThisWorkbook.Styles.Add(STYLE_NAME) End Try sty.Font.Name = "Verdana" sty.Font.Size = 12 sty.Font.Color = ColorTranslator.ToOle(Color.Blue) sty.Interior.Color = ColorTranslator.ToOle(Color.LightGray) sty.Interior.Pattern = XlPattern.xlPatternSolid rng.Style = STYLE_NAME rng.Columns.AutoFit()End Sub// C#private void ApplyStyle(){ const String STYLE_NAME = "PropertyBorder"; // Get the range containing all the document properties. Excel.Range rng = GetDocPropRange(); Excel.Style sty; try { sty = ThisWorkbook.Styles[STYLE_NAME]; } catch { sty = ThisWorkbook.Styles.Add(STYLE_NAME, Type.Missing); } sty.Font.Name = "Verdana"; sty.Font.Size = 12; sty.Font.Color = ColorTranslator.ToOle(Color.Blue); sty.Interior.Color = ColorTranslator.ToOle(Color.LightGray); sty.Interior.Pattern = Excel.XlPattern.xlPatternSolid; rng.Style = STYLE_NAME; rng.Columns.AutoFit();}GetDocPropRange 方法返回一个由文档属性填充的范围。这个过程使用 Range.End 方法来查找由文档属性填充的范围的结尾,并且基于这个范围的左上角和右下角创建一个新的范围:
' Visual BasicPrivate Function GetDocPropRange() As Excel.Range Dim rng As Excel.Range = _ ThisApplication.Range("DocumentProperties") Dim rngStart As Excel.Range = _ DirectCast(rng.Cells(1, 1), Excel.Range) Dim rngEnd As Excel.Range = _ rng.End(Excel.XlDirection.xlDown).Offset(0, 1) Return ThisApplication.Range(rngStart, rngEnd)End Function// C#private Excel.Range GetDocPropRange(){ Excel.Range rng = ThisApplication.get_Range("DocumentProperties", Type.Missing); Excel.Range rngStart = (Excel.Range) rng.Cells[1, 1]; Excel.Range rngEnd = rng.get_End(Excel.XlDirection.xlDown).get_Offset(0, 1); return ThisApplication.get_Range(rngStart, rngEnd);}提示 要想知道关于检索和使用 Range 对象的更多信息,请参看本文后面标题为“使用 Range”的章节。
一旦您运行了这段代码,在示例工作簿中包含文档属性的区域会改变底纹和字体,如图 11 所示。
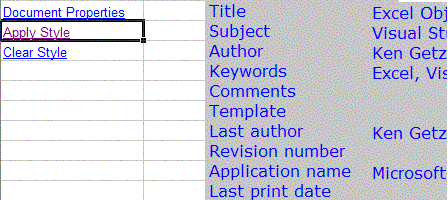
图 11. 应用自定义样式之后
单击 Clear Style 运行以下过程,它清除同一区域的样式:
' Visual BasicPrivate Sub ClearStyle() ' Get the range containing all the document properties, and ' clear the style. GetDocPropRange().Style = "Normal"End Sub// C#private void ClearStyle(){ // Get the range containing all the document properties, and // clear the style. GetDocPropRange().Style = "Normal";}使用表Workbook 类提供了一个 Sheets 属性,它返回一个 Sheets 对象。这个对象包含 Sheet 对象集合,其中每个对象既可以是 Worksheet 对象,也可以是 Chart 对象。单击示例工作簿的 List Sheets 链接来运行下面的过程,它列出工作簿中的所有现有的表:
' Visual BasicPrivate Sub ListSheets() Dim sh As Excel.Worksheet Dim rng As Excel.Range Dim i As Integer rng = ThisApplication.Range("Sheets") For Each sh In ThisWorkbook.Sheets rng.Offset(i, 0).Value = sh.Name i = i + 1 Next shEnd Sub// C#private void ListSheets(){ int i = 0; Excel.Range rng = ThisApplication.get_Range("Sheets", Type.Missing); foreach (Excel.Worksheet sh in ThisWorkbook.Sheets) { rng.get_Offset(i, 0).Value2 = sh.Name; i = i + 1; }}您可能还会发现下面的 Sheets 类的成员会很有用。
| • | Visible 属性可以让您在不删除和重建表的情况下显示或隐藏一个现有的表。可将 Visibility 属性设置成XlSheetVisibility 枚举值(XlSheetHidden、XlSheetVeryHidden、xlSheetVisible)中的一个值。使用XlSheetHidden 可以让用户通过 Excel 界面隐藏表;使用 XlSheetVeryHidden,则要求您运行代码来取消隐藏表:
' Visual BasicDirectCast(ThisWorkbook.Sheets(1), Excel.Worksheet).Visible = _ Excel.XlSheetVisibility.xlSheetVeryHidden// C#((Excel.Worksheet) ThisWorkbook.Sheets[1]).Visible = Excel.XlSheetVisibility.xlSheetVeryHidden; | | • | Add 方法允许您将一个新表添加到工作簿中的表集合中,并且可以接受四个可选参数,这些参数可以指明表的位置、要添加的表数和表的类型(工作表、图表等):
' Visual BasicDim sh As Excel.Sheet = ThisWorkbook.Sheets.Add()// C#Excel.Sheet sh = ThisWorkbook.Sheets.Add( Type.Missing, Type.Missing, Type.Missing, Type.Missing); | | • | Copy 方法创建一个表的副本,并且将表插入到指定的位置。您可以随意指定将新表插入到现有表的前面或者后面。如果您不指定位置,Excel 会创建一个新的工作簿来存放这个新表。下面的代码片段复制当前工作簿中的第一个表,并且将副本放在第三个表的后面:
' Visual BasicDirectCast(ThisWorkbook.Sheets(1), Excel.Worksheet). _ Copy(After:=ThisWorkbook.Sheets((3)))// C#((Excel.Worksheet) ThisWorkbook.Sheets[1]). Copy(Type.Missing, ThisWorkbook.Sheets[3]);. | | • | Delete 方法删除一个指定的表:
' Visual BasicDirectCast(ThisWorkbook.Sheets(1), Excel.Worksheet).Delete// C#((Excel.Worksheet) ThisWorkbook.Sheets[1]).Delete(); | | • | FillAcrossSheets 方法将工作簿内一个表的范围中的数据复制到所有其他表。您需要指定一个范围,以及是否要复制数据、进行格式化,或全部,剩下的工作 Excel 会去处理。下面的代码片段在工作簿中,将一个表中名称为 Data 的范围的数据和复制到所有表的同一区域中,并对这些数据进行格式化:
' Visual BasicThisWorkbook.Sheets.FillAcrossSheets( _ ThisApplication.Range("Data"), Excel.XlFillWith.xlFillWithAll)// C#ThisWorkbook.Sheets.FillAcrossSheets( ThisApplication.get_Range("Data", Type.Missing), Excel.XlFillWith.xlFillWithAll); | | • | Move 方法和 Copy 方法很类似,只不过最终您得到的是表的一个实例。您可以指定将表放到您的表的前面,或者放到后面(但不可以同时指定)。同样的,如果您没有为移动的表指定一个位置,Excel 会创建一个新的工作簿来包含它。下面的代码片段将第一个工作表移到最后:
' Visual BasicDim shts As Excel.Sheets = ThisWorkbook.SheetsDirectCast(shts(1), Excel.Worksheet).Move(After:=shts(shts.Count))// C#Excel.Sheets shts = ThisWorkbook.Sheets;((Excel.Worksheet)shts[1]).Move(Type.Missing, shts[shts.Count]);提示 如果出于某种原因您要对工作簿中的表列表进行排序,您可以使用 Move 方法来进行一个低效的冒泡排序。当然,您不可能有太多的表,所以排序速度不是个问题。
| | • | PrintOut 方法允许您打印选择的对象(这个方法适用于多个不同的对象)。您可以指定许多可选的参数,包括:要打印的页数(起始页和终止页)、副本数量、打印前是否进行预览、要使用的打印机的名称、是否打印到一个文件、是否进行逐份打印以及您要打印到的文件名。下面的例子使用默认的打印机打印指定的表、只打印第一页、打印两份副本,并且在打印前预览文档:
' Visual BasicDirectCast(ThisWorkbook.Sheets(1), Excel.Worksheet). _ PrintOut(From:=1, To:=1, Copies:=2, Preview:=True)// C#((Excel.Worksheet)ThisApplication.Sheets[1]). PrintOut(1, 1, 2, true, Type.Missing, Type.Missing, Type.Missing, Type.Missing); | | • | PrintPreview 方法允许您在 PrintPreview 窗口显示指定的对象,并且可以选择禁止更改页面布局:
' Visual BasicDirectCast(ThisWorkbook.Sheets(1), Excel.Worksheet). _ PrintPreview(False)// C#((Excel.Worksheet)ThisApplication.Sheets[1]).PrintPreview(false); | | • | Select 方法选择指定的对象,并且改变用户的选择(可使用 Activate 方法使对象获得焦点,而不需改变用户的选择。)您可以有选择地提供一个被当前选择取代的对象的引用。下面的代码片段选择第一个工作表:
' Visual BasicActiveWorkbook.Sheets(1).Select()// C#((Excel.Worksheet)ThisApplication.Sheets[1]).Select(Type.Missing);提示 在这一部分中列出的许多方法也适用于其他的类。例如,PrintOut 方法是由以下类提供的:Chart、Charts、Range、Sheets、 Window、Workbook、Worksheet 和 Worksheets。这些方法的具体使用是相同的,只不过是作用在不同的对象上而已。Select 方法几乎适用于任何一种可选择的对象(并且这样的对象有很多)。
|
Workbook 类的方法Workbook 类提供了大量的方法,其中有许多方法处理一些非常特殊的情况。这一部分探讨一些在每个应用程序中您都可能会用到的方法,而不是详细介绍各种方法,并将一些难理解的方法放在后面的章节中介绍,下面的列表描述了一些您最可能使用的方法:
| • | Activate 方法激活一个工作簿,并且选择工作簿中的第一个工作表:
' Visual BasicThisApplication.Workbooks(1).Activate// C#ThisApplication.Workbooks[1].Activate; | | • | Close 方法关闭一个指定的工作簿,并且(可选)指定是否保存修改。如果工作簿从未保存过,则可以指定一个文件名。此外,如果您要将工作簿发送给其他用户,您可以指定您是否想将工作簿发送给下一个用户。下面的代码片段关闭工作簿,并且不保存修改:
' Visual BasicThisApplication.Workbooks(1).Close(SaveChanges:=False)// C#ThisApplication.Workbooks(1).Close(false, Type.Missing, Type.Missing); | | • | Protect 和 Unprotect 方法允许您保护一个工作簿,从而不能添加或者删除工作表,以及再次取消保护工作簿。您可以指定一个密码(可选),并且指明是否保护工作簿的结构(这样用户就不能移动工作表)以及工作簿的窗口(可选)。保护工作簿用户仍可以编辑单元格。要想保护数据,您必须保护工作表。调用 Unprotect 方法(如果需要,还要传递一个密码)可以取消保护工作簿。以下示例假定一个名称为 GetPasswordFromUser 的过程,它要求用户输入密码,并且会返回输入的值:
' Visual BasicThisApplication.Workbooks(1).Protect(GetPasswordFromUser())// C#ThisApplication.Workbooks[1].Protect( GetPasswordFromUser(), Type.Missing, Type.Missing); | | • | 正如您所认为的,Save 方法保存工作簿。如果您还未保存过工作簿,则应该调用 SaveAs 方法,这样您可以指定一个路径(如果还未保存过工作簿,Excel 会将其保存在当前文件夹中,并以创建工作簿时所给的名称命名):
' Visual Basic' Save all open workbooks.Dim wb As Excel.WorkbookFor Each wb in ThisApplication.Workbooks wb.SaveNext wb// C#// Save all open workbooks.foreach (Excel.Workbook wb in ThisApplication.Workbooks){ wb.Save();} | | • | SaveAs 方法要比 Save 方法复杂的多。这个方法允许您保存指定的工作簿,并且指定名称、文件格式、密码、访问模式和其他更多的选项(可选)。查看联机帮助可以获得所有选项列表。下面的代码片段将当前工作簿保存到一个指定位置,并且存成 XML 格式:
' Visual BasicThisApplication.ActiveWorkbook.SaveAs("C:/MyWorkbook.xml", _ FileFormat:=Excel.XlFileFormat.xlXMLSpreadsheet)// C#ThisApplication.ActiveWorkbook.SaveAs("C://MyWorkbook.xml", Excel.XlFileFormat.xlXMLSpreadsheet, Type.Missing, Type.Missing, Type.Missing, Type.Missing, Excel.XlSaveAsAccessMode.xlNoChange, Type.Missing, Type.Missing, Type.Missing, Type.Missing, Type.Missing);提示 由于保存成某些格式需要一些交互,您也许想在调用 SaveAs 方法之前将 Application.DisplayAlerts 属性设置成 False。例如,在将一个工作表保存成 XML 格式时,Excel 会提醒您不能随工作簿保存 VBA 项目。如果将 DisplayAlerts 属性设置成 False,就不会出现这种警告。
| | • | SaveCopyAs 方法将工作簿的一个副本保存到文件中,但不会修改在内存中打开的工作簿。当您想创建工作簿的备份,同时不修改工作簿的位置时,这个方法非常有用:
' Visual BasicThisApplication.ActiveWorkbook.SaveCopyAs("C:/Test.xls")// C#ThisApplication.ActiveWorkbook.SaveCopyAs("C://Test.xls");警告 交互式地取消任何保存或者复制工作簿的方法会在您的代码中触发一个运行时异常。例如,如果您的过程调用 SaveAs 方法,但是没有禁用 Excel 的提示功能,并且您的用户在提示后单击“取消”,则 Excel 会将运行时错误返回给代码。
|
 返回页首
返回页首
Worksheet 类当您阅读到文章的此处时,您已经了解了使用一个单独的工作表需要掌握的大多数概念。尽管 Worksheet 类提供了大量的成员,但是其大多数的属性、方法和事件与 Application 和(或) Workbook 类提供的成员是相同的或相似的。这一部分将集中探讨 Worksheet 类的重要成员及特定问题,这些问题是您在本文的其他部分所没有接触过的内容。(您可以在示例工作簿中的 Worksheet Object 工作表看到这一部分中的例子。)
不存在 Sheet 类尽管 Excel 提供了一个 Sheets 集合作为 Workbook 对象的属性,但是在 Excel 中您找不到 Sheet 类。相反,Sheets 集合的每个成员都是 Worksheet 或 Chart 对象。您可以以这种方式考虑它:把 Worksheet 和Chart 类看成内部 Sheet 类的特定实例(并且对无法访问源代码的人来说,将无法知道这种看法是否和实际的实现相符),但是 Sheet 类对外部不可用。
使用保护通常,Excel 中的保护功能可以防止用户和(或)代码修改工作表内的对象。一旦您启用了对工作表保护功能,除非您预作安排,否则用户不能编辑或者修改工作表。在用户界面内,您可以使用 Tools|Protection|Protect Sheet菜单项启用保护功能。当选择此项后会显示“保护工作表”对话框,如图 12 所示。您可以在此设置密码或者允许用户执行特定的操作。默认情况下,一旦启用保护功能,所有的单元格都会被锁定。此外,通过使用Tools|Protection|Allow Users to Edit Ranges 菜单项(它会显示如图 13 所示的对话框),您可以让用户编辑特定区域。将这两个对话框结合使用,您可以锁定工作表,然后可以让用户编辑特定的功能和区域。
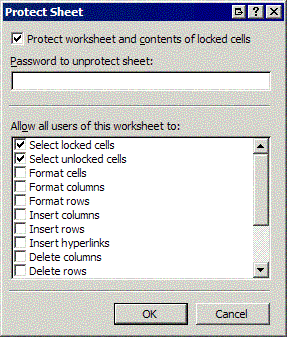
图 12. 在用户界面中,使用此对话框的控制保护。
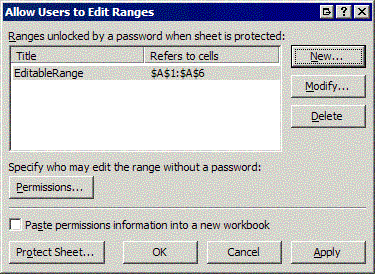
图 13. 使用此对话框,您可以允许用户编辑特定的区域。
您可以使用工作表的 Protect 方法通过编程方法控制对工作表的保护。这个方法的语法如下面的例子所示,其中的每个参数都是可选的:
' Visual BasicWorksheetObject.Protect(Password, DrawingObjects, Contents, _ Scenarios, UserInterfaceOnly, AllowFormattingCells, _ AllowFormattingColumns, AllowFormattingRows, _ AllowInsertingColumns, AllowInsertingRows, _ AllowInsertingHyperlinks, AllowDeletingColumns, _ AllowDeletingRows, AllowSorting, AllowFiltering, _ AllowUsingPivotTables)// C#WorksheetObject.Protect(Password, DrawingObjects, Contents, Scenarios, UserInterfaceOnly, AllowFormattingCells, AllowFormattingColumns, AllowFormattingRows, AllowInsertingColumns, AllowInsertingRows, AllowInsertingHyperlinks, AllowDeletingColumns, AllowDeletingRows, AllowSorting, AllowFiltering, AllowUsingPivotTables);下面的列表描述了 Protect 方法的参数:
| • | 设置 Password 参数来指定一个区分大小写的字符串,这是取消保护工作表所需要的。如果您不指定这个参数,任何人都可以取消保护工作表。
| | • | 将 DrawingObjects 参数设置为 True 来保护工作表的形状。默认值为 False。
| | • | 将 Contents 参数设置为 True 来保护工作表的内容(单元格)。默认值为 True,您可能永远不会改变它。
| | • | 将 Scenarios 参数设置为 True 来保护工作表中的方案。默认值为 True。
| | • | 将 UserInterfaceOnly 参数设置为 True 可以允许通过代码修改,但是不允许通过用户界面修改。默认值为 False,这意味着通过代码和用户界面项都不可以修改受保护的工作表。这个属性设置只适用于当前会话。如果您想让代码可以在任何会话中都可以操作工作表,那么您需要每次工作簿打开的时候添加设置这个属性的代码。
| | • | AllowFormattingCells 参数、AllowFormattingColumns 参数和前面方法语法的完整列表中所示的其余参数允许特定的格式化功能,对应于对话框中(如图 12 所示)的选项。默认情况下,所有这些属性都是 False。
|
可以调用工作表的 Protect 方法来保护工作表,如下面的代码片段所示,这段代码设置了密码,并且只允许排序:
' Visual BasicDirectCast(ThisApplication.Sheets(1), Excel.Worksheet). _ Protect("MyPassword", AllowSorting:=True)// C#((Excel.Worksheet)ThisApplication.Sheets[1]).Protect( "MyPassword", Type.Missing, Type.Missing, Type.Missing, Type.Missing, Type.Missing, Type.Missing, Type.Missing, Type.Missing, Type.Missing, Type.Missing, Type.Missing, Type.Missing, true, Type.Missing, Type.Missing);提示很明显,在您的代码中硬编码密码并不是一个很好的主意。最常见的情况是,您需要从用户那里得到密码,然后将这个密码应用于工作簿,但不保存。通常,在源代码中您是不会看到硬编码密码的。
为了取消对工作表的保护,您可以使用下面的代码。这段代码假定有一个名称为 GetPasswordFromUser 的过程,这个过程要求用户输入一个密码,并且返回输入的密码值:
' Visual BasicDirectCast(ThisApplication.Sheets(1), Excel.Worksheet). _ Unprotect(GetPasswordFromUser())// C#((Excel.Worksheet)ThisApplication.Sheets[1]). Unprotect(GetPasswordFromUser());Unprotect 方法将取消对工作表的保护,并让您提供一个可选的密码。
Excel 也提供其他两个对象,您将会发现,当使用保护的时候它们很有用:Protection 和 AllowEditRange 对象。Protection 对象封装了您调用 Protect 方法时指定的所有信息,及未保护区域的信息。通过调用 Protect 方法设置共享的 Protection 对象的属性,这些对象提供了以下对应于 Protect 方法的参数的 Boolean 属性:
| • | AllowDeletingColumns, AllowDeletingRows
| | • | AllowFiltering
| | • | AllowFormattingCells, AllowFormattingColumns, AllowFormattingRows
| | • | AllowInsertingColumns, AllowInsertingHyperlinks, AllowInsertingRows
| | • | AllowSorting
| | • | AllowUsingPivotTables
|
此外,Protection 类提供 AllowEditRanges 属性,它允许您指定工作表上的可编辑区域,对应于在图 13 中所示的对话框中指定的信息。 AllowEditRanges 属性包含一个 AllowEditRange 对象集合,其中的每个对象都提供许多有用的属性,包括:
| • | Range:获取或者设置对应于可编辑区域的范围
| | • | Title:获取或者设置可编辑区域的标题(用于在如图 13 所示的对话框中显示)。
| | • | Users:获取或者设置 UserAccess 对象集合(有关 UserAccess 对象的更多信息,请参考联机文档)。
|
在示例工作簿上的 WorksheetObject 工作表(见图 14)中,您可以试验一下通过编程实现的保护功能。单击Protect 保护工作表,这样您就只能编辑处于阴影区域的内容(名称为 Information 和 Date 的两个范围)。单击Unprotect取消保护工作表。

图 14. 测试工作表的保护功能。
在示例工作表中的链接会运行以下过程:
' Visual BasicPrivate Sub ProtectSheet() Dim ws As Excel.Worksheet = _ DirectCast(ThisApplication.ActiveSheet, Excel.Worksheet) With ws.Protection.AllowEditRanges .Add("Information", ThisApplication.Range("Information")) .Add("Date", ThisApplication.Range("Date")) End With ws.Protect()End SubPrivate Sub UnprotectSheet() Dim ws As Excel.Worksheet = _ DirectCast(ThisApplication.Sheets("Worksheet Class"), _ Excel.Worksheet) ' Unprotect the sheet. ws.Unprotect() ' Delete all protection ranges, just to clean up. ' You must loop through this using the index, ' backwards. This collection doesn't provide ' an enumeration method, and it doesn't handle ' being resized as you're looping in a nice way. Dim i As Integer With ws.Protection.AllowEditRanges For i = .Count To 1 Step -1 .Item(i).Delete() Next i End WithEnd Sub// C#private void ProtectSheet(){ Excel.Worksheet ws = (Excel.Worksheet)ThisApplication.ActiveSheet; Excel.AllowEditRanges ranges = ws.Protection.AllowEditRanges; ranges.Add("Information", ThisApplication.get_Range("Information", Type.Missing), Type.Missing); ranges.Add("Date", ThisApplication.get_Range("Date", Type.Missing), Type.Missing); ws.Protect(Type.Missing, Type.Missing, Type.Missing, Type.Missing, Type.Missing,Type.Missing, Type.Missing, Type.Missing,Type.Missing, Type.Missing, Type.Missing, Type.Missing,Type.Missing,Type.Missing, Type.Missing,Type.Missing);}private void UnprotectSheet(){ Excel.Worksheet ws = (Excel.Worksheet) ThisApplication.Sheets["Worksheet Class"]; ws.Unprotect(Type.Missing); // Delete all protection ranges, just to clean up. // You must loop through this using the index, // backwards. This collection doesn't provide // an enumeration method, and it doesn't handle // being resized as you're looping in a nice way. Excel.AllowEditRanges ranges = ws.Protection.AllowEditRanges; for (int i = ranges.Count; i >= 1; i--) { ranges.Delete(); }}对象属性Worksheet 类提供了几个返回对象的属性。下面的章节将介绍这些对象,并提供使用这些对象的例子。
批注
使用 Insert|Comment 菜单项,您可以在工作表的一个范围中插入附加的文本批注(见图 15)。在代码中使用Range 对象的 AddComment 方法也可以达到相同目的。下面的代码删除与名为 Date 的范围相关联的批注(若存在批注),然后创建一个新的批注。最后,代码通过调用下一个代码示例所描述的 ShowOrHideComments 方法来显示工作表中的所有批注(见图 16):
' Visual BasicDim rng As Excel.Range = ThisApplication.Range("Date")If Not rng.Comment Is Nothing Then rng.Comment.Delete()End Ifrng.AddComment("Comment added " & DateTime.Now)' Display all the comments:ShowOrHideComments(Show:=True)// C#Excel.Range rng = ThisApplication.get_Range("Date", Type.Missing);if (rng.Comment != null ) { rng.Comment.Delete();}rng.AddComment("Comment added " + DateTime.Now);// Display all the comments:ShowOrHideComments(true);
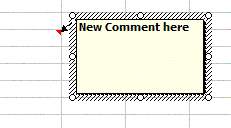
图 15. 在用户界面中您可以方便地将一个新的批注插入到工作表中。
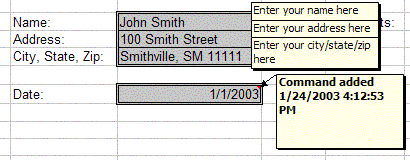
图 16. 在示例工作表中显示所有批注后
Worksheet 类提供了它的 Comments 属性,这个属性返回一个 Comments 对象。这个 Comment 对象集合允许您循环访问和 Worksheet 相关的所有 Comment 对象。 Comment 类并没有提供很多成员。可以使用Comment 类的 Visible 属性来显示或者隐藏批注,或者使用 Delete 方法删除批注。此外,您可能发现 Text 方法很有用:这个方法允许您将文本添加到批注中,可以添加到现有文本的后面,也可以覆盖现有的文本。
添加一个批注后,您可能想要显示工作表中的批注。示例项目包含一个过程 ShowOrHideComments,这个过程会显示或者隐藏所有在活动工作表中的批注:
' Visual BasicPrivate Sub ShowOrHideComments(ByVal Show As Boolean) ' Show or hide all the comments: Dim ws As Excel.Worksheet = _ DirectCast(ThisApplication.Sheets("Worksheet Class"), _ Excel.Worksheet) Dim i As Integer For i = 1 To ws.Comments.Count ws.Comments(i).Visible = Show NextEnd Sub// C#private void ShowOrHideComments(bool show){ // Show or hide all the comments: Excel.Worksheet ws = (Excel.Worksheet) ThisApplication.Sheets["Worksheet Class"]; for (int i = 1; i <= ws.Comments.Count; i++) { ws.Comments.Visible = show; }}注 与 Excel 中的许多辅助集合类相似,Comments 集合没有提供一个默认的枚举器。也就是说,您将不能使用一个 For Each 循环来访问这个集合的所有元素。对于类似 Comment 集合的集合,您必须使用一个索引的循环来循环访问这个集合。
提纲
Excel通过使用提纲功能支持将不同行的数据进行分组。您也可以在代码中利用相同的功能。例如,给定如图 17 所示的一组行,您可以添加提纲功能(在所示的图中已添加),这样您就能够将这些行进行折叠(如图 18 所示),折叠的组如图 19 所示。
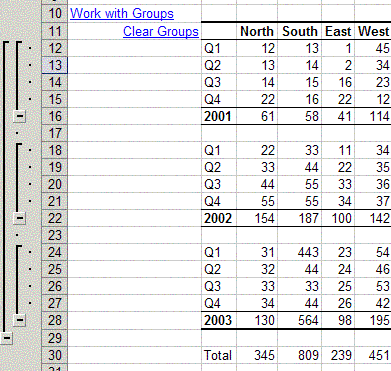
图 17. 创建这些组
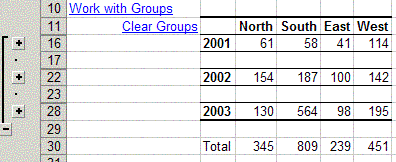
图 18. 折叠的组

图 19. 完全折叠的组
Worksheet 类提供了 Outline 属性,它本身就是一个 Outline 对象。 Outline 类并没有提供太多成员,下面的列表描述了您可能会使用到的成员:
| • | AutomaticStyles (Boolean) 向 Excel 指示是否对提纲应用自动样式。
| | • | SummaryColumn (XlSummaryColumn) 获取或设置摘要列的位置。 XlSummaryColumn 枚举有两个可能使用的值:xlSummaryOnLeft 和 xlSummaryOnRight。
| | • | SummaryRow (XlSummaryRow) 获取或设置摘要行的位置。 XlSummaryRow 枚举具有两个可能使用的值:xlSummaryAbove 和 xlSummaryBelow。
| | • | ShowLevels 允许您折叠提纲组或者将其扩展到您想要的行级和(或)列级。您可以给这个方法传递两个参数,如下面的代码所示:
' Visual BasicDim ws As Excel.Worksheet = _ DirectCast(ThisApplication.ActiveSheet, Excel.Worksheet)' Specify RowLevels and/or ColumnLevels parameters:ws.Outline.ShowLevels(RowLevels:=3)// C#Excel.Worksheet ws = (Excel.Worksheet) ThisApplication.ActiveSheet;// Specify RowLevels and/or ColumnLevels parameters:ws.Outline.ShowLevels(3, Type.Missing); |
示例工作表包含对应于 2001 (Data2001) 和 2002 (Data2001) 年及整个行集 (AllData) 的数据的命名范围。这些命名范围覆盖工作表的整个范围;要想进行分组,您必须使用包含所有行的范围。对于 2003 的数据,没有一个和其关联的命名范围以便示例代码演示如何将所有的行作为范围使用。
创建组是很简单的:可以调用与一个或多个完整行相对应的一个范围的 Group 方法来创建组。(您可以指定 4 个可选的分组参数,包括:被分组的开始和终止值、按值分组和一个表明分组周期的 Boolean 值数组。该示例中没有使用这些可选参数,因为您很少会使用这些参数。)调用 Ungroup 方法可以取消分组。例如,单击示例工作表上的 WorkwithGroups 链接来运行下面的代码:
' Visual BasicPrivate Sub WorkWithGroups() Dim ws As Excel.Worksheet = _ DirectCast(ThisApplication.ActiveSheet, Excel.Worksheet) ' Set worksheet-level features for the outline. ' In this case, summary rows are below ' the data rows (so Excel knows where to put ' the summary rows), and we don't want Excel ' to format the summary rows--that's already been done. ws.Outline.SummaryRow = Excel.XlSummaryRow.xlSummaryBelow ws.Outline.AutomaticStyles = False ' Group the two named ranges. Each of these ' ranges extends across entire rows. ThisApplication.Range("Data2001").Group() ThisApplication.Range("Data2002").Group() ThisApplication.Range("AllData").Group() ' The range of rows from 24 to 27 doesn't have ' a named range, so you can work with that ' range directly. Dim rng As Excel.Range = _ DirectCast(ws.Rows("24:27"), Excel.Range) rng.Group() ' Collapse to the second group level. ws.Outline.ShowLevels(RowLevels:=2)End Sub// C#private void WorkWithGroups(){ Excel.Worksheet ws = (Excel.Worksheet) ThisApplication.ActiveSheet; // Set worksheet-level features for the outline. // In this case, summary rows are below // the data rows (so Excel knows where to put // the summary rows), and we don't want Excel // to format the summary rows--that's already been done. ws.Outline.SummaryRow = Excel.XlSummaryRow.xlSummaryBelow; ws.Outline.AutomaticStyles = false; // Group the two named ranges. Each of these // ranges extends across entire rows. ThisApplication.get_Range("Data2001", Type.Missing). Group(Type.Missing, Type.Missing, Type.Missing, Type.Missing); ThisApplication.get_Range("Data2002", Type.Missing). Group(Type.Missing, Type.Missing, Type.Missing, Type.Missing); ThisApplication.get_Range("AllData", Type.Missing). Group(Type.Missing, Type.Missing, Type.Missing, Type.Missing); // The range of rows from 24 to 27 doesn't have // a named range, so you can work with that // range directly. Excel.Range rng = (Excel.Range)ws.Rows["24:27", Type.Missing]; rng.Group(Type.Missing, Type.Missing, Type.Missing, Type.Missing); // Collapse to the second group level. ws.Outline.ShowLevels(2, Type.Missing);}为了对三个命名范围分组,代码只是简单的调用相应范围的 Group 方法:
' Visual BasicThisApplication.Range("Data2001").Group()// C#ThisApplication.get_Range("Data2001", Type.Missing). Group(Type.Missing, Type.Missing, Type.Missing, Type.Missing);为了对未命名的范围分组,代码使用了工作表的 Rows 属性,给定行范围。这个属性返回一个对应于要使用的行的范围:
' Visual BasicDim rng As Excel.Range = _ DirectCast(ws.Rows("24:27"), Excel.Range)rng.Group()// C#Excel.Range rng = (Excel.Range)ws.Rows["24:27", Type.Missing];rng.Group(Type.Missing, Type.Missing, Type.Missing, Type.Missing);单击示例工作表中的 Clear Groups 链接来运行类似代码,这样可以清除组:
' Visual BasicPrivate Sub ClearGroups() Dim ws As Excel.Worksheet = _ DirectCast(ThisApplication.ActiveSheet, Excel.Worksheet) ' Specify RowLevels and/or ColumnLevels parameters: ws.Outline.ShowLevels(RowLevels:=3) Dim rng As Excel.Range = _ DirectCast(ws.Rows("24:27"), Excel.Range) rng.Ungroup() ThisApplication.Range("Data2001").Ungroup() ThisApplication.Range("Data2002").Ungroup() ThisApplication.Range("AllData").Ungroup()End Sub// C#private void ClearGroups(){ Excel.Worksheet ws = (Excel.Worksheet) ThisWorkbook.Sheets["Worksheet Class"]; // Specify RowLevels and/or ColumnLevels parameters: ws.Outline.ShowLevels(3, Type.Missing); Excel.Range rng = (Excel.Range) ws.Rows["24:27", Type.Missing]; rng.Ungroup(); ThisApplication.get_Range("Data2001", Type.Missing).Ungroup(); ThisApplication.get_Range("Data2002", Type.Missing).Ungroup(); ThisApplication.get_Range("AllData", Type.Missing).Ungroup();}通过使用这些方法,您可以创建和删除组,并且可以控制工作表中显示的组级。
 返回页首
返回页首
Range 对象Range 对象是您在 Excel 应用程序中最经常使用的对象;在您可以操作 Excel 内的任何区域之前,您需要将其表示为一个 Range 对象,然后使用该 Range 对象的方法和属性。Range 类是很重要的,目前为止,本篇文章中的每个示例中在某种程度上都使用了一个 Range 对象。基本上来说,一个 Range 对象代表一个单元格、一行、一列、包含一个或者更多单元块(可以是连续的单元格,也可以式不连续的单元格)的选定单元格,甚至是多个工作表上的一组单元格。
由于不可能讨论 Range 这个大类的所有成员,所以这一部分集中探讨三个主要的问题:
| • | 在代码中引用范围。
| | • | 在代码中操作范围。
| | • | 使用Range 对象达到特定目的。
|
换句话说,由于 Range 对象在众多不同场合下有众多不同用途,所有本节集中回答“我如何……”这样的问题,而不是提供对所有成员全面的列表。
管理选择区域尽管使用当前选择区域作为修改一个范围的属性和行为的做法很具有吸引力,但是您最好避免这样做。就像任何其他共享资源一样,在 Excel 内的选择区域代表用户的选择。如果您在代码中修改该选择区域,将会导致用户失去对当前选择区域的控制。经验法则是:只有在您想改变用户的选择区域时,才可以调用对象的 Select 方法。作为一个开发人员,您不能只是为了方便就去调用 Select 方法。如果您的目的只是设置一个范围的属性,总会有其他替代方法。总之,避免使用 Select 方法不但可以使您的代码运行得更快,还可以使您的用户免受干扰。
如下代码清除用户当前单元格相邻区域,编写这样的代码是很简单的:
' Visual BasicThisApplication.ActiveCell.CurrentRegion.SelectDirectCast(ThisApplication.Selection, Excel.Range).ClearContents// C#ThisApplication.ActiveCell.CurrentRegion.Select();((Excel.Range)ThisApplication.Selection).ClearContents();这样做会取消用户的选择。如果最初只选择一个单元格,那么当运行前面的代码片段后,单元格附近的整大块将会被选定。实际上,除非您的目的是选择所有的单元格区域,否则使用如下所示代码是更好的解决方案:
' Visual BasicThisApplication.ActiveCell.CurrentRegion.ClearContents// C#ThisApplication.ActiveCell.CurrentRegion.ClearContents();为什么任何人都会想到使用第一个代码片段呢?之所以会使用这样的代码,是因为 Excel 开发人员在尝试发现如何使用 Excel 内的各种对象及其方法的一开始都会倾向于使用 Excel 宏记录器。这个一个好主意,但是宏记录器编写 的代码实在很糟糕。通常,宏记录器使用了选择区域,并在记录任何任务的时候修改选择区域。
提示 当使用一个或一组单元格时,尽可能使用描述您想使用的单元格的范围,而不是修改选择区域。如果您的目的是更改用户的选择区域,则使用 Range.Select 方法。
在代码中引用 RangeRange 类是很灵活的,您在编程使用范围的时候会发现它给您提供太多的选择。有时 Range 对象是单个的对象,而有时它代表对象的一个集合。它具有 Item 和 Count 成员,尽管 Range 对象通常指单个的对象,这使得有时如何准确使用 Range 对象成为一件很棘手的事情。
提示 下面的几个示例获得一个范围的 Address 属性。这个属性返回一个包含范围坐标的字符串,坐标以下面几种格式之一表示,包括:“$A$1”(单元格在位置 A1)、“$1”(在工作表的第一行)和“$A$1:$C$5”(范围包括介于 A1 和 C5 之间矩形内的所有单元格)。“$”表示绝对坐标(而非相对坐标)。使用 Address 属性是找到您要检索的范围的准确位置的最简单方法。有关引用范围的各种方法的更多信息,请参考 Excel 联机帮助。
以其最简单的方式,您可以编写如下程序清单所示的代码来使 Range 对象引用单个单元格或者一组单元格。所有示例都假定具有下面的设置代码:
' Visual BasicDim ws As Excel.Worksheet = _ DirectCast(ThisWorkbook.Worksheets(1), Excel.Worksheet)Dim rng, rng1, rng2 As Excel.Range// C#Excel.Worksheet ws = (Excel.Worksheet)ThisWorkbook.Worksheets[1];Excel.Range rng, rng1, rng2;您可以使用下面的任何一种方法来引用一个特定范围(也有其他几种取得 Range 对象引用的方法):
| • | 引用 Application 对象的 ActiveCell 属性:
' Visual Basicrng = ThisApplication.ActiveCell// C#rng = ThisApplication.ActiveCell; | | • | 使用对象的 Range 属性指定一个区域。由于 C# 不支持参数化的非索引属性,作为替代,您必须调用get_Range 方法,这个方法需要两个参数:
' Visual Basicrng = ws.Range("A1")rng = ws.Range("A1:B12")// C#rng = ws.get_Range("A1", Type.Missing);rng = ws.get_Range("A1:B12", Type.Missing); | | • | 使用工作表的 Cells 属性,指定单个行和列值:
' Visual Basic' The Cells collection returns an Object--' Convert it to a Range object explicitly:rng = DirectCast(ws.Cells(1, 1), Excel.Range)// C#rng = (Excel.Range)ws.Cells[1, 1]; | | • | 指定一个范围的“角落”;您也可以直接引用范围的 Cells、Rows 或 Columns 属性;每种情况下,属性都返回一个范围:
' Visual Basicrng = ws.Range("A1", "C5")rng = ws.Range("A1", "C5").Cellsrng = ws.Range("A1", "C5").Rowsrng = ws.Range("A1", "C5").Columns// C#rng = ws.get_Range("A1", "C5");rng = ws.get_Range("A1", "C5").Cells;rng = ws.get_Range("A1", "C5").Rows;rng = ws.get_Range("A1", "C5").Columns; | | • | 引用一个命名范围。您可以看到本文广泛使用这种技术。注意:由于 C# 的 get_Range 方法需要两个参数,而范围名只需要其中的一个参数,所以您必须为第二个参数指定 Type.Missing:
' Visual Basicrng = ThisApplication.Range("SomeRangeName")// C#rng = ThisApplication.Range("SomeRangeName", Type.Missing); | | • | 引用特定行或特定列或行和列的范围;注意:Rows 和 Columns 属性都返回一个 Object,如果您将 Option Strict 设置成 On,则需要类型转换:
' Visual Basicrng = DirectCast(ws.Rows(1), Excel.Range)rng = DirectCast(ws.Rows("1:3"), Excel.Range)rng = DirectCast(ws.Columns(3), Excel.Range)// C#rng = (Excel.Range)ws.Rows[1, Type.Missing];rng = (Excel.Range)ws.Rows["1:3", Type.Missing];rng = (Excel.Range)ws.Columns[3, Type.Missing];警告Columns 属性的 IntelliSense 功能是容易误解的 — 它表明您必须指定行值,然后指定列值。在实际应用中,Columns 属性的值是取倒数的。对于 Rows 和 Columns 属性,不使用第二个参数。
| | • | 使用 Application 对象的 Selection 属性返回与选定单元格对应的范围;在如图 20 所示的情况下,下面的代码片段返回字符串“$C$3”(使用“$”表示绝对坐标):
' Visual BasicDebug.WriteLine( _ DirectCast(ThisApplication.Selection, Excel.Range).Address)// C#System.Diagnostics.Debug.WriteLine( ((Excel.Range)ThisApplication.Selection). get_Address(Type.Missing, Type.Missing, Excel.XlReferenceStyle.xlA1, Type.Missing, Type.Missing));提示Address 属性是 C# 不能直接处理的另一个参数化属性。调用 get_Address 方法来取得对应于 Range 对象的地址。 Address 属性的所有参数都是可选的,但是 get_Address 方法要取得 5 个参数 — 您可能只需要关心第三个参数,它允许您指定地址格式。
| | • | 创建一个包含其他两个合并范围的范围(在引号内指定两个范围,并用逗号隔开):
' Visual Basicrng = ThisApplication.Range("A1:D4, F2:G5")' You can also use the Application object's Union' method to retrieve the intersection of two ranges:rng1 = ThisApplication.Range("A1:D4")rng2 = ThisApplication.Range("F2:G5")rng = ThisApplication.Union(rng1, rng2)// C#rng = ThisApplication.get_Range("A1:D4, F2:G5", Type.Missing);// You can also use the Application object's Union// method to retrieve the intersection of two ranges, but this// is far more effort in C#:rng1 = ThisApplication.get_Range("A1", "D4");rng2 = ThisApplication.get_Range("F2", "G5");// Note that the Union method requires you to supply thirty// parameters: rng = ThisApplication.Union(rng1, rng2, Type.Missing, Type.Missing, Type.Missing, Type.Missing, Type.Missing, Type.Missing, Type.Missing, Type.Missing, Type.Missing, Type.Missing, Type.Missing, Type.Missing, Type.Missing, Type.Missing, Type.Missing, Type.Missing, Type.Missing, Type.Missing, Type.Missing, Type.Missing, Type.Missing, Type.Missing, Type.Missing, Type.Missing, Type.Missing, Type.Missing, Type.Missing, Type.Missing); | | • | 创建一个引用其他两个范围重叠部分的范围(在引号内指定两个范围,并不使用分隔符):
' Visual Basicrng = ThisApplication.Range("A1:D16 B2:F14")' You can also use the Application object's Intersect' method to retrieve the intersection of two ranges:rng1 = ThisApplication.Range("A1:D16")rng2 = ThisApplication.Range("B2:F14")rng = ThisApplication.Intersect(rng1, rng2)// C#rng = ThisApplication.get_Range("A1:D16 B2:F14", Type.Missing);// You can also use the Application object's Intersect// method to retrieve the intersection of two ranges. Note// that the Intersect method requires you to pass 30 parameters:rng1 = ThisApplication.get_Range("A1", "D16");rng2 = ThisApplication.get_Range("B2", "F14");rng = ThisApplication.Intersect(rng1, rng2, Type.Missing, Type.Missing, Type.Missing, Type.Missing, Type.Missing, Type.Missing, Type.Missing, Type.Missing, Type.Missing, Type.Missing, Type.Missing, Type.Missing, Type.Missing, Type.Missing, Type.Missing, Type.Missing, Type.Missing, Type.Missing, Type.Missing, Type.Missing, Type.Missing, Type.Missing, Type.Missing, Type.Missing, Type.Missing, Type.Missing, Type.Missing, Type.Missing); | | • | 使用范围的 Offset 属性取得相对于初始范围的一个范围;以下示例在位于第一行、第一列的单元格范围中添加内容:
' Visual Basicrng = DirectCast(ws.Cells(1, 1), Excel.Range)Dim i As IntegerFor i = 1 To 5 rng.Offset(i, 0).Value = i.ToStringNext// C#rng = (Excel.Range) ws.Cells[1, 1];for (int i = 1; i <= 5; i++){ rng.get_Offset(i, 0).Value2 = i.ToString();}提示Range.Offset 属性是一个参数化的属性,因此 C# 代码不能直接取得这个属性值。作为替代,C# 开发人员必须调用 get_Offset 方法。
| | • | 使用范围的 CurrentRegion 属性取得一个代表当前区域的范围,这个当前区域由最近的空行和列限定;例如,在图 20 中,以下表达式将当前区域的字体设置成粗体:
' Visual BasicThisApplication.Range("C3").CurrentRegion.Font.Bold = True// C#ThisApplication.get_Range("C3", Type.Missing). CurrentRegion.Font.Bold = True;

图 20. 请求 C3 单元格的 CurrentRegion 属性返回 A1:E5 范围。
| | • | 使用范围的 Areas 属性取得范围集合,其中每个范围对应于范围内容的一个区域。例如,下面的代码片段显示了名称为 Test 的范围内两个区域的地址,“$B$1:$E$5”和“$C$7:$G$11”(使用“$”代表绝对坐标),如图 21 所示:
' Visual Basicrng = ThisApplication.Range("Test")Dim i As IntegerFor i = 1 To rng.Areas.Count Debug.WriteLine(rng.Areas(i).Address)Next// C#rng = ThisApplication.get_Range("Test", Type.Missing);for (int i = 1; i <= rng.Areas.Count; i++){ System.Diagnostics.Debug.WriteLine( rng.Areas.get_Address(Type.Missing, Type.Missing, Excel.XlReferenceStyle.xlA1, Type.Missing, Type.Missing));}
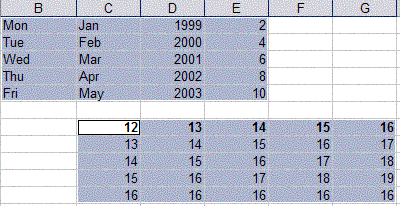
图 21. 范围包含的区域可以不连续,并且可以使用 Areas 属性分别取得这些区域。
| | • | 使用 End 属性,以及一个 XlDirection 枚举值(xlUp、xlToRight、xlToLeft、xlDown)来取得一个代表区域末端单元格的范围,如同您按下了枚举值所描述的键一样;使用如图 22 所示的选定单元格,下面的代码片段会得到四个定义的范围(如代码中的注释所示):
' Visual BasicDim rngLeft, rngRight, rngUp, rngDown as Excel.Rangerng = DirectCast(ThisApplication.Selection, Excel.Range)' E3rngRight = rng.End(Excel.XlDirection.xlToRight)' A3rngLeft = rng.End(Excel.XlDirection.xlToLeft)' C1rngUp = rng.End(Excel.XlDirection.xlUp)' C5rngDown = rng.End(Excel.XlDirection.xlDown)// C#Excel.Range rngLeft, rngRight, rngUp, rngDown;rng = (Excel.Range) ThisApplication.Selection;// Note that the Range.End property is parameterized, so // C# developers cannot retrieve it. You must call the // get_End method, instead:// E3rngRight = rng.get_End(Excel.XlDirection.xlToRight);// A3rngLeft = rng.get_End(Excel.XlDirection.xlToLeft);// C1rngUp = rng.get_End(Excel.XlDirection.xlUp);// C5rngDown = rng.get_Down(Excel.XlDirection.xlDown);

图 22. 使用 End 属性返回对应于一个范围的范围。
| | • | 使用 EntireRow 或 EntireColumn 属性引用包含特定范围的行或列。例如,下面的代码片段使用图 21 中所示的示例将第 7 行到第 11 行的字体设置成粗体:
' Visual Basicrng = ThisApplication.Range("Test")rng.Areas(2).EntireRow.Font.Bold = True// C#rng = ThisApplication.get_Range("Test", Type.Missing);rng.Areas[2].EntireRow.Font.Bold = true; |
使用技术开发人员通常要求具有这样的能力:改变包含选定单元格的整行的字体,使文本变成粗体。Excel 中并没有内置这个功能,但是添加它也不是非常困难。示例工作簿中的 Range 类的工作表包含一个特别处理的范围:当您选择一个条目,其所在行会变成粗体。图 23 显示了这一行为。

图 23. 选择一个条目使整行变成粗体。
示例工作簿包含以下过程来处理格式化:
' Visual BasicPrivate Sub BoldCurrentRow(ByVal ws As Excel.Worksheet) ' Keep track of the previously bolded row. Static intRow As Integer ' Work with the current active cell. Dim rngCell As Excel.Range = _ ThisApplication.ActiveCell ' Bold the current row. rngCell.EntireRow.Font.Bold = True ' Make sure intRow isn't 0 (meaning that ' this is your first pass through here). If intRow <> 0 Then ' If you're on a different ' row than the last time through here, ' make the old row not bold. If rngCell.Row <> intRow Then Dim rng As Excel.Range = _ DirectCast(ws.Rows(intRow), Excel.Range) rng.EntireRow.Font.Bold = False End If End If ' Store away the new row number ' for next time. intRow = rngCell.RowEnd Sub// C#private int LastBoldedRow = 0;private void BoldCurrentRow(Excel.Worksheet ws) { // Keep track of the previously bolded row. // Work with the current active cell. Excel.Range rngCell = ThisApplication.ActiveCell; // Bold the current row. rngCell.EntireRow.Font.Bold = true; // Make sure intRow isn't 0 (meaning that // this is your first pass through here). if (LastBoldedRow != 0) { // If you're on a different // row than the last time through here, // make the old row not bold. if (rngCell.Row != LastBoldedRow) { Excel.Range rng = (Excel.Range)ws.Rows[LastBoldedRow, Type.Missing]; rng.Font.Bold = false; } } // Store away the new row number // for next time. LastBoldedRow = rngCell.Row;}这个示例采用如下步骤来使当前行变成粗体,并且使前一次变成粗体的行变回原来的状态:
| • | 声明一个变量(在 Visual Basic 中,类型为静态)用来跟踪前面选定的行:
' Visual BasicStatic intRow As Integer// C#private int LastBoldedRow = 0; | | • | 使用 Application.ActiveCell 属性取得对当前单元格的引用:
' Visual Basicprivate int LastBoldedRow = 0;Dim rngCell As Excel.Range = ThisApplication.ActiveCell// C#Excel.Range rngCell = ThisApplication.ActiveCell; | | • | 使用活动单元格的 EntireRow 属性使当前行变成粗体:
' Visual BasicrngCell.EntireRow.Font.Bold = True// C#rngCell.EntireRow.Font.Bold = true; | | • | 确保 intRow 的当前值不为 0,如果为 0,则表明这是第一次运行这段代码:
' Visual BasicIf intRow <> 0 Then ' Code removed here...End If// C#if (LastBoldedRow != 0){ // Code removed here...} | | • | 确保当前行和前面的行不同。如果当前行和前面的行不同,代码只需修改行的状态。Row 属性返回一个整数值来指明对应于范围的行:
' Visual BasicIf rngCell.Row <> intRow Then ' Code removed here...End If// C#if (rngCell.Row != LastBoldedRow){ // Code removed here...} | | • | 检索一个代表前面选定行的范围的引用,并将那一行设置成不为粗体:
' Visual BasicDim rng As Excel.Range = _ DirectCast(ws.Rows(intRow), Excel.Range)rng.Font.Bold = False// C#Excel.Range rng = (Excel.Range)ws.Rows[LastBoldedRow, Type.Missing];rng.Font.Bold = false; |
示例工作簿从它的 SheetSelectionChange 事件处理程序调用 BoldCurrentRow 过程。在这个过程中,代码验证新选择的行是否位于正确范围(使用 Application 对象的 Intersect 方法),如果是,就调用BoldCurrentRow 过程:
' Visual BasicPrivate Sub ThisWorkbook_SheetSelectionChange( _ ByVal Sh As Object, ByVal Target As Excel.Range) _ Handles ThisWorkbook.SheetSelectionChange If Not ThisApplication.Intersect(Target, _ ThisApplication.Range("BoldSelectedRow")) Is Nothing Then ' The selection is within the range where you're making ' the selected row bold. BoldCurrentRow(DirectCast(Sh, Excel.Worksheet)) End IfEnd Sub// C#protected void ThisWorkbook_SheetSelectionChange( System.Object sh, Excel.Range Target){ // Don't forget that the Intersect method requires // thirty parameters. if (ThisApplication.Intersect(Target, ThisApplication.get_Range("BoldSelectedRow", Type.Missing), Type.Missing, Type.Missing, Type.Missing, Type.Missing, Type.Missing, Type.Missing, Type.Missing, Type.Missing, Type.Missing, Type.Missing, Type.Missing, Type.Missing, Type.Missing, Type.Missing, Type.Missing, Type.Missing, Type.Missing, Type.Missing, Type.Missing, Type.Missing, Type.Missing, Type.Missing, Type.Missing, Type.Missing, Type.Missing, Type.Missing, Type.Missing, Type.Missing) != null) { // The selection is within the range where you're making //the selected row bold. BoldCurrentRow((Excel.Worksheet) sh); }}使用 Range一旦您得到了对一个范围的引用,您能用它作什么呢?可以列出的用途是无穷的,只要您能够想象得到。这一节集中讨论一些使用 Range 对象的技术,并且为每种技术提供简单的示例。这一部分中的所有示例都可以在示例工作簿的 Range Class 工作表中找到。
自动填充范围
Range 类的 AutoFill 方法允许您使用值自动填充一个范围。大多数情况下,AutoFill 方法用于将递增或递减的值存储到一个范围中。您可以通过提供可选的常量来指定此方法的行为。这个常量来自 XlAutoFillType 枚举(xlFillDays、xlFillFormats、xlFillSeries、xlFillWeekdays、xlGrowthTrend、xlFillCopy、xlFillDefault、xlFillMonths、xlFillValues、xlFillYears 或 xlLinearTrend)。如果您不指定一个填充类型,Excel 会假定您使用默认填充类型(xlFillDefault),并且填充它认为合适的指定范围。
示例工作表(如图 24 所示)包含四个将被自动填充的区域。列 B 包含五个工作日;列 C 包含五个月;列 D 包含五年内逐年递增的日期;列 E 包含一系列数字,每行以二递增。图 25 显示运行示例代码后的相同区域。

图 24. 调用 AutoFill 方法之前的四个示例范围。

图 25. 自动填充范围后。
单击 AutoFill 链接运行以下过程:
' Visual BasicPrivate Sub AutoFill() Dim rng As Excel.Range = ThisApplication.Range("B1") rng.AutoFill(ThisApplication.Range("B1:B5"), _ Excel.XlAutoFillType.xlFillDays) rng = ThisApplication.Range("C1") rng.AutoFill(ThisApplication.Range("C1:C5"), _ Excel.XlAutoFillType.xlFillMonths) rng = ThisApplication.Range("D1") rng.AutoFill(ThisApplication.Range("D1:D5"), _ Excel.XlAutoFillType.xlFillYears) rng = ThisApplication.Range("E1:E2") rng.AutoFill(ThisApplication.Range("E1:E5"), _ Excel.XlAutoFillType.xlFillSeries)End Sub// C#private void AutoFill(){ Excel.Range rng = ThisApplication.get_Range("B1", Type.Missing); rng.AutoFill(ThisApplication.get_Range("B1:B5", Type.Missing), Excel.XlAutoFillType.xlFillDays); rng = ThisApplication.get_Range("C1", Type.Missing); rng.AutoFill(ThisApplication.get_Range("C1:C5", Type.Missing), Excel.XlAutoFillType.xlFillMonths); rng = ThisApplication.get_Range("D1", Type.Missing); rng.AutoFill(ThisApplication.get_Range("D1:D5", Type.Missing), Excel.XlAutoFillType.xlFillYears); rng = ThisApplication.get_Range("E1:E2", Type.Missing); rng.AutoFill(ThisApplication.get_Range("E1:E5", Type.Missing), Excel.XlAutoFillType.xlFillSeries);}每种情况您都必须指定两个范围:
| • | 调用 AutoFill 方法的范围,它指定填充的“起点”。
| | • | 将要被填充的范围,它作为参数传递给 AutoFill 方法;目的范围必须包含源范围。
|
AutoFill 方法的第二个参数(XlAutoFillType 枚举值)是可选的。通常,您需要提供该值才能得到您想要的行为。例如,尝试改变以下代码:
' Visual Basicrng.AutoFill(ThisApplication.Range("D1:D5"), _ Excel.XlAutoFillType.xlFillYears)// C#rng.AutoFill(ThisApplication.get_Range("D1:D5", Type.Missing), Excel.XlAutoFillType.xlFillYears);使之看起来像这样:' Visual Basicrng.AutoFill(ThisApplication.Range("D1:D5"))// C#rng.AutoFill(ThisApplication.get_Range("D1:D5", Type.Missing), Excel.XlAutoFillType.xlFillDefault);代码经过修改后,日期将按天递增,而不是按年递增。
在范围中查找
Range 类的 Find 方法允许您在范围内搜索文本。这个灵活的方法模仿 Excel 中的查找和替换对话框的行为,如图 26 所示 - 实际上,这个方法直接和这个对话框交互。也就是说,Range.Find 方法或者使用您传递给它的参数来决定它的搜索行为,或者如果您没有传递参数,它就使用其在查找和替换对话框中的值来进行查找。表 4 列出了Range.Find 方法的参数,除了第一个参数外,其他所有参数都是可选的。
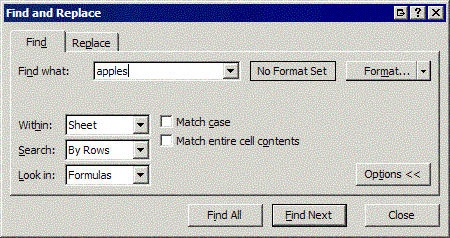
图 26. 在这个对话框上的选择会影响 Find 方法的行为。
警告因为 Range.Find 的几乎所有参数都是可选的,同时因为用户可能通过“查找和替换”对话框改变值,所以您要确保真正将所有值传给了 Find 方法,除非您想将用户的选择也考虑在内。当然,C# 开发人员不需要担心这个问题,因为他们在每个方法调用时都必须提供所有参数。
表 4. Range.Find 方法的参数
参数类型说明
What(必需的) 对象 要查找的数据;可以是一个字符串或者任何 Excel 数据类型。
After 范围 您想从这个范围的后面开始搜索(在搜索中,不包括这个单元格);如果不指定单元格,则从范围的左上角开始搜索。
LookIn XlFindLookin(xlValue、xlComments、xlFormulas)
LookAt XlLookAt(xlWhole、xlPart)
SearchOrder XlSearchOrder(xlByRows、xlByColumns) 决定搜索顺序;xlByRows(默认值)将横向搜索,然后纵向搜索;xlByColumns 将纵向搜索,然后横向搜索。
SearchDirection XlSearchDirection(xlNext、xlPrevious)
MatchCase 布尔值
MatchByte 布尔值 确定是否双字节字符只和双字节匹配 (True) 或者也可以和单字节字符匹配 (False);只有当您安装了对双字节支持时才适用。
以下示例来自示例工作簿,它搜索一个范围(名称为“Fruits”),并更改含有单词“apples”的单元格的字体(图 27显示了搜索结果)。这个过程也使用了 FindNext 方法,它使用前面设好的搜索设置重复搜索。(Range.FindPrevious 方法和 Range.FindNext 方法的使用几乎一样,但这个示例没用到。)您要指定在哪个单元格后搜索,而剩下的就由 FindNext 方法处理。

图 27. 包含单词“apples”的单元格的搜索结果
提示FindNext(和 FindPrevious)方法一旦搜索到范围的末端,就会重新回到搜索范围的开始位置。要确保搜索不会成为无限循环,永远不休,您需要在代码中设定。示例过程演示了处理这种情况的一种方法。如果您想完全避免这种无限循环,或者您想进行一个比 Find/FindNext/FindPrevious 方法更加复杂的搜索,那么您也可以使用一个 For Each 循环在一个范围内对所有单元格进行循环查找。
单击示例工作簿的 Range Class 工作表中的 Find 链接来运行以下过程:
' Visual BasicPrivate Sub DemoFind() Dim rng As Excel.Range = ThisApplication.Range("Fruits") Dim rngFound As Excel.Range ' Keep track of the first range you find. Dim rngFoundFirst As Excel.Range ' You should specify all these parameters ' every time you call this method, since they ' can be overriden in the user interface. rngFound = rng.Find( _ "apples", , _ Excel.XlFindLookIn.xlValues, Excel.XlLookAt.xlPart, _ Excel.XlSearchOrder.xlByRows, Excel.XlSearchDirection.xlNext, False) While Not rngFound Is Nothing If rngFoundFirst Is Nothing Then rngFoundFirst = rngFound ElseIf rngFound.Address = rngFoundFirst.Address Then Exit While End If With rngFound.Font .Color = ColorTranslator.ToOle(Color.Red) .Bold = True End With rngFound = rng.FindNext(rngFound) End WhileEnd Sub// C#private void DemoFind(){ Excel.Range rng = ThisApplication. get_Range("Fruits", Type.Missing); Excel.Range rngFound; // Keep track of the first range you find. Excel.Range rngFoundFirst = null; // You should specify all these parameters // every time you call this method, since they // can be overriden in the user interface. rngFound = rng.Find("apples", Type.Missing, Excel.XlFindLookIn.xlValues, Excel.XlLookAt.xlPart, Excel.XlSearchOrder.xlByRows, Excel.XlSearchDirection.xlNext, false, Type.Missing, Type.Missing); while (rngFound != null) { if (rngFoundFirst == null ) { rngFoundFirst = rngFound; } else if (GetAddress(rngFound) == GetAddress(rngFoundFirst)) { break; } rngFound.Font.Color = ColorTranslator.ToOle(Color.Red); rngFound.Font.Bold = true; rngFound = rng.FindNext(rngFound); }}这段代码采取这些步骤来实现其目的:
| • | 声明 Excel.Range 变量来跟踪整个范围、第一个被发现的范围和当前发现的范围:
' Visual BasicDim rng As Excel.Range = ThisApplication.Range("Fruits")Dim rngFound As Excel.RangeDim rngFoundFirst As Excel.Range// C#Excel.Range rng = ThisApplication. get_Range("Fruits", Type.Missing);Excel.Range rngFound;Excel.Range rngFoundFirst = null; | | • | 搜索第一个匹配值,指定所有的参数(要在以后搜索的单元格除外) — 默认情况下,搜索从范围左上角的单元格开始 — 然后在单元格值中搜索“apples”,匹配部分值,逐行向前搜索,并且不区分大小写:
' Visual BasicrngFound = rng.Find( _ "apples", , _ Excel.XlFindLookIn.xlValues, Excel.XlLookAt.xlPart, _ Excel.XlSearchOrder.xlByRows, Excel.XlSearchDirection.xlNext, _ False)// C#rngFound = rng.Find("apples", Type.Missing, Excel.XlFindLookIn.xlValues, Excel.XlLookAt.xlPart, Excel.XlSearchOrder.xlByRows, Excel.XlSearchDirection.xlNext, false, Type.Missing, Type.Missing); | | • | 只要还能发现匹配值搜索就会继续下去:
' Visual BasicWhile Not rngFound Is Nothing ' Code removed here...End While// C#while (rngFound != null){ // Code removed here...} | | • | 将第一个发现的范围 (rngFoundFirst) 和 Nothing 进行比较,如果代码只发现第一个匹配值,rngFoundFirst 就会为 Nothing,也只有在这种情况下它才会为 Nothing。在这种情况下,代码将找到的范围保存起来;否则,如果找到的范围地址和第一个找到的范围地址一致,代码会退出循环。
' Visual BasicIf rngFoundFirst Is Nothing Then rngFoundFirst = rngFoundElseIf rngFound.Address = rngFoundFirst.Address Then Exit WhileEnd If// C#if (rngFoundFirst == null ) { rngFoundFirst = rngFound;}else if (GetAddress(rngFound) == GetAddress(rngFoundFirst)){ break;} | | • | 设置找到的范围的外观:
' Visual BasicWith rngFound.Font .Color = ColorTranslator.ToOle(Color.Red) .Bold = TrueEnd With// C#rngFound.Font.Color = ColorTranslator.ToOle(Color.Red);rngFound.Font.Bold = true; | | • | 执行另一次搜索:
' Visual BasicrngFound = rng.FindNext(rngFound)// C#rngFound = rng.FindNext(rngFound); |
单击示例工作表的 Reset Find 链接来运行这个简单的过程,开始运行时将会重新设置范围:
' Visual BasicPrivate Sub ResetFind() Dim rng As Excel.Range = ThisApplication.Range("Fruits") With rng.Font .Color = ColorTranslator.ToOle(Color.Black) .Bold = False End WithEnd Sub// C#private void ResetFind(){ Excel.Range rng = ThisApplication. get_Range("Fruits", Type.Missing); rng.Font.Color = ColorTranslator.ToOle(Color.Black); rng.Font.Bold = false;}提示 如果您想在一个范围内查找和替换,请使用 Range.Replace 方法。这个方法的使用类似于 Find 方法,但是可以让您指定要替换的值。 Replace 方法返回一个指示是否执行替换的 Boolean 值。即使只替换一个值,它也会返回 True。
在范围中对数据进行排序就如通过 Excel 用户界面对一个范围内的数据进行排序一样,您也可以采用编程方式使用 Range.Sort 方法对数据进行排序。您指出要被排序的范围,要进行排序的至多三行或三列(可选),以及其他可选的参数,剩下的则由 Excel 来处理。表 5 列出了 Sort 方法的所有参数。(Visual Basic .NET 开发人员很可能只会用到其中的一部分,而 C# 开发人员则必须为每个参数赋予值。)
表 5. Sort 方法的参数
参数类型说明
Key1 Object(String 或 Range) 首要排序字段,可以是一个范围名称 (String),或是一个 Range 对象,确定了要排序的值。
Order1 XlSortOrder(xlAscending、xlDescending)
Key2 Object(String 或 Range)
Type Object 当对透视表进行排序时,指定对哪些元素排序;对一个普通范围则没有影响。
Order2 XlSortOrder
Key3 Object(String 或 Range)
Order3 XlSortOrder
Header XlYesNoGuess(xlGuess、xlNo、xlYes) 指定第一行是否包含头信息,默认值为 xlNo;如果想让 Excel 自己去推测,就指定为 xlGuess。
OrderCustom Integer 为自定义排序顺序列表指定一个基于 1 的索引;如果不指定这个参数,则使用默认排序顺序。图 28 显示了一种创建自定义排序顺序的技术。对于这个例子,将这个参数指定为 6 将基于“fruits”自定义顺序进行排序。
MatchCase Boolean 设置成 True 就会进行区分大小写的排序,设置成 False 则进行不区分大小写的排序;不能用于透视表。
Orientation XlSortOrientation (xlSortRows, xlSortColumns)
SortMethod XlSortMethod(xlStroke、xlPinYin) 指定排序方法;不能适用于所有语言(当前值只适用于对汉字进行排序,而不适用于对其他语言排序)。
DataOption1 XlSortDataOption (xlSortTextAsNumbers, xlSortNormal) 指定如何对 Key1 中指定的范围进行文本排序;不能用于透视表排序。
DataOption2 XlSortDataOption 指定如何对 Key2 中指定的范围进行文本排序;不能用于透视表排序。
DataOption3 XlSortDataOption 指定如何对 Key3 中指定的范围进行文本排序;不能用于透视表排序。
提示当调用像这样的方法时,Visual Basic .NET 开发人员相对于 C# 开发人员来说,有着明显的优势。因为您不太可能会用到所有参数,Visual Basic .NET 开发人员能够使用命名的参数,只须指定他们需要的参数即可。而为了接受默认行为,C# 开发人员必须将所有不使用的参数传递 null 值。
图 28. 您可以创建自己的自定义排序列表,然后在代码中引用这些特定的排序顺序。
单击 Range Class 示例工作表中的 Sort 链接运行以下过程,它首先根据第一列中的数据来对“Fruits”范围排序,然后根据第二列中的数据排序:
' Visual BasicPrivate Sub DemoSort() Dim rng As Excel.Range = ThisApplication.Range("Fruits") rng.Sort( _ Key1:=rng.Columns(1), Order1:=Excel.XlSortOrder.xlAscending, _ Key2:=rng.Columns(2), Order2:=Excel.XlSortOrder.xlAscending, _ Orientation:=Excel.XlSortOrientation.xlSortColumns, _ Header:=Excel.XlYesNoGuess.xlNo)End Sub// C#private void DemoSort(){ Excel.Range rng = ThisApplication. get_Range("Fruits", Type.Missing); rng.Sort(rng.Columns[1, Type.Missing], Excel.XlSortOrder.xlAscending, rng.Columns[2, Type.Missing],Type.Missing, Excel.XlSortOrder.xlAscending, Type.Missing, Excel.XlSortOrder.xlAscending, Excel.XlYesNoGuess.xlNo, Type.Missing, Type.Missing, Excel.XlSortOrientation.xlSortColumns, Excel.XlSortMethod.xlPinYin, Excel.XlSortDataOption.xlSortNormal, Excel.XlSortDataOption.xlSortNormal, Excel.XlSortDataOption.xlSortNormal);}单击同一个工作表中的 Reset Sort 链接来运行以下过程,它根据自定义排序方法对第二列进行排序,如图 28 所示:
' Visual BasicPrivate Sub ResetSort() Dim rng As Excel.Range = ThisApplication.Range("Fruits") rng.Sort(rng.Columns(2), OrderCustom:=6, _ Orientation:=Excel.XlSortOrientation.xlSortColumns, _ Header:=Excel.XlYesNoGuess.xlNo)End Sub// C#private void ResetSort(){ Excel.Range rng = ThisApplication. get_Range("Fruits", Type.Missing); rng.Sort(rng.Columns[2, Type.Missing], Excel.XlSortOrder.xlAscending, Type.Missing, Type.Missing, Excel.XlSortOrder.xlAscending, Type.Missing, Excel.XlSortOrder.xlAscending, Excel.XlYesNoGuess.xlNo, 6, Type.Missing, Excel.XlSortOrientation.xlSortColumns, Excel.XlSortMethod.xlPinYin, Excel.XlSortDataOption.xlSortNormal, Excel.XlSortDataOption.xlSortNormal, Excel.XlSortDataOption.xlSortNormal);}
 返回页首
返回页首
下期内容尽管本文看似冗长,但是它只是涉及到了由 Excel 对象模型提供的大量内容的表面而已。本文介绍了最重要的类 —Application、Workbook、Worksheet 和 Range — 但是没有介绍其他可能对您有用的类。您也许需要研究由 Excel 对象模型提供的第二“层”类,例如,PivotTable 和 Chart 类。只要您肯费心寻找您需要的确切类,那么 Excel 对象模型的完整性使得您可以完成任何您所要求的自动化任务。只要掌握本文的内容、Object Browser 和 Excel VBA 联机帮助,您就应该能够胜任在 Excel 中所能想象到的任何任务了。
|
|
 如果你在论坛求助问题,并且已经从坛友或者管理的回复中解决了问题,请把帖子标题加上【已解决】;
 如何回报帮助你解决问题的坛友,一个好办法就是给对方加【D豆】,加分不会扣除自己的积分,做一个热心并受欢迎的人!
 |申请友链|Archiver|手机版|小黑屋|辽公网安备|晓东CAD家园
( 辽ICP备15016793号 )